It’s finally done. Over the past few months, the Glitz Pit Discord Server (link at the end of this post) has been debating and voting on how good and how bad badges in Paper Mario: The Thousand-Year Door and Paper Mario are. Finally, this past week, discussion on badges for 64 has completed. It’s the end of creating tier lists for the Glitz Pit…for now.
We had some 30+ players voting in the Glitz Pit, and all votes were taken and boiled down to a score. However, because of this, some votes for each player for certain badges differ from what is shown on the Glitz Pit. Obviously, this is to be expected; I, of course, have some pretty varied opinions on some badges, so let’s once again compare how I’d rate them to how the Glitz Pit rated them!
Before we do that, let’s categorize what each tier means (taken directly from the Glitz Pit on ranking badges):
S Tier — Well above average
A Tier — Above average
B Tier — Slightly above average
C Tier — Average
D Tier — Slightly below average
E Tier — Below average
F Tier — Well below average
Now, F Tier badges aren’t “unusable”…generally speaking, S-B tier are badges you’ll likely keep equipped a good portion of the time, while C-F are more niche picks and filler.
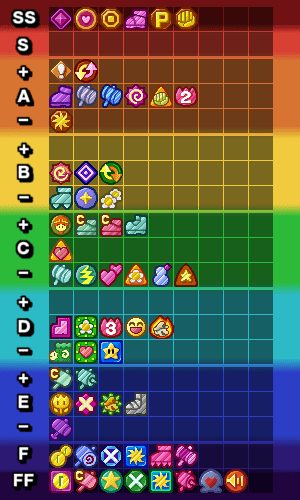
First, let’s take a look at the Glitz Pit’s ranking. A few things to note are that, because of the aggregate of votes, there are +/- categories in each tier to represent a high/low end. SS = S+, and FF = F-. Badges within each tier aren’t listed in any order — they were basically listed by the order we voted them in (credit to Jdaster64 for the image).
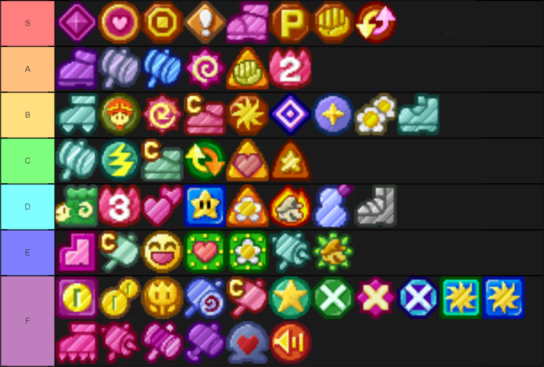
Now, here’s mine. I don’t really care what’s on the high or low end of a tier, so I didn’t include those. That also means I have no SS or FF tier. This is basically a list of how I voted for these badges during the rankings, so keep that in mind. They’re sorted in the order we voted them in per tier.
I’ll talk about a few key differences:
All or Nothing (GLRB: A+; Kappy: S) — I wanted to point this one out because All or Nothing is S in TTYD on the Glitz Pit tier list and it’s still got the same perks over Power Plus and is available even earlier (and it’s from Rowf’s Badge Shop)! Can’t believe it didn’t make it to S here. I thought it was a no-brainer.
Dizzy Jump – (GLRB: E; Kappy: D) — While I understand that using FP to deal the same damage as a normal jump can sometimes be a waste, I’d maintain that this one has slightly more use in certain boss fights because many are aerial, even if you can use Dizzy Dials. If Sleep Stomp is D and you have access to Sleepy Sheep, I think this one follows suit easily. What really surprises me is that this badge was rated better than Shrink Stomp.
Refund (GLRB: E; Kappy: F) — I’m really hard-pressed to understand how Refund got into F when it doesn’t serve much use besides giving you back some coins when you use items. Cool to use with Double Dip or Triple Dip, but there are so many other (and better) filler options.
Those are the big differences I wanted to comment on; to be honest, there weren’t many big differences in tiers between mine and the Glitz Pit. What do you think of each list? Agree, disagree? Let me know in the comments below, or on Twitter, or on Facebook!
Oh, and thanks for reading all of these! I hope these helped you to understand how challenge runners (and I) approach these games. These lists will likely be refined in the future (and I’ll definitely make another post when that’s the case) but for now, this is the end of the Glitz Pit tier list series.
Just Sayin’

You must be logged in to post a comment.