Paper Mario Talks — Kappy’s 64 Badge Tier List (& comparison to Glitz Pit Tier List)

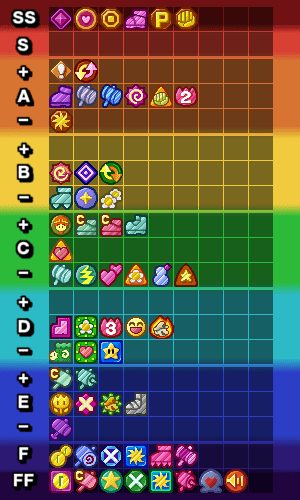
It’s finally done. Over the past few months, the Glitz Pit Discord Server (link at the end of this post) has been debating and voting on how good and how bad badges in Paper Mario: The Thousand-Year Door and Paper Mario are. Finally, this past week, discussion on badges for 64 has completed. It’s the end of creating tier lists for the Glitz Pit…for now.

We had some 30+ players voting in the Glitz Pit, and all votes were taken and boiled down to a score. However, because of this, some votes for each player for certain badges differ from what is shown on the Glitz Pit. Obviously, this is to be expected; I, of course, have some pretty varied opinions on some badges, so let’s once again compare how I’d rate them to how the Glitz Pit rated them!

Before we do that, let’s categorize what each tier means (taken directly from the Glitz Pit on ranking badges):

S Tier — Well above average
A Tier — Above average
B Tier  — Slightly above average
C Tier — Average
D Tier — Slightly below average
E Tier — Below average
F Tier — Well below average
Now, F Tier badges aren’t “unusable”…generally speaking, S-B tier are badges you’ll likely keep equipped a good portion of the time, while C-F are more niche picks and filler.

First, let’s take a look at the Glitz Pit’s ranking. A few things to note are that, because of the aggregate of votes, there are +/- categories in each tier to represent a high/low end. SS = S+, and FF = F-. Badges within each tier aren’t listed in any order — they were basically listed by the order we voted them in (credit to Jdaster64 for the image).

glitz-pit-64-rankings.png
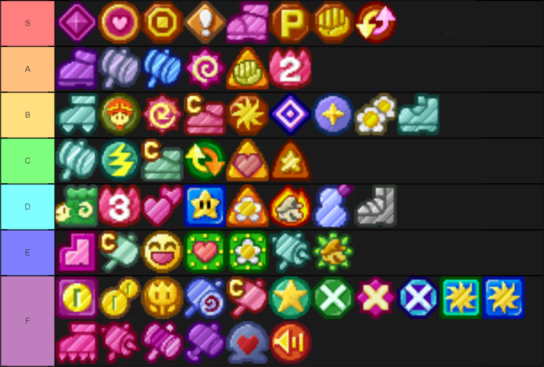
Now, here’s mine. I don’t really care what’s on the high or low end of a tier, so I didn’t include those. That also means I have no SS or FF tier. This is basically a list of how I voted for these badges during the rankings, so keep that in mind. They’re sorted in the order we voted them in per tier.

my-image.png
I’ll talk about a few key differences:

All or Nothing (GLRB: A+; Kappy: S) — I wanted to point this one out because All or Nothing is S in TTYD on the Glitz Pit tier list and it’s still got the same perks over Power Plus and is available even earlier (and it’s from Rowf’s Badge Shop)! Can’t believe it didn’t make it to S here. I thought it was a no-brainer.

Dizzy Jump – (GLRB: E; Kappy: D) — While I understand that using FP to deal the same damage as a normal jump can sometimes be a waste, I’d maintain that this one has slightly more use in certain boss fights because many are aerial, even if you can use Dizzy Dials. If Sleep Stomp is D and you have access to Sleepy Sheep, I think this one follows suit easily. What really surprises me is that this badge was rated better than Shrink Stomp.

Refund (GLRB: E; Kappy: F) — I’m really hard-pressed to understand how Refund got into F when it doesn’t serve much use besides giving you back some coins when you use items. Cool to use with Double Dip or Triple Dip, but there are so many other (and better) filler options.

Those are the big differences I wanted to comment on; to be honest, there weren’t many big differences in tiers between mine and the Glitz Pit. What do you think of each list? Agree, disagree? Let me know in the comments below, or on Twitter, or on Facebook!

Oh, and thanks for reading all of these! I hope these helped you to understand how challenge runners (and I) approach these games. These lists will likely be refined in the future (and I’ll definitely make another post when that’s the case) but for now, this is the end of the Glitz Pit tier list series.

Just Sayin’


Advertisement

Paper Mario Talks — Kappy’s Partner & Special Move/Star Power Tier Lists (+ comparison to Glitz Pit lists)

As I said in my previous entry, the Glitz Pit Discord Server (link at the bottom of this post) cast judgment on badges in Paper Mario: The Thousand-Year Door, bringing to light a tier list for more hardcore players. This time, we’re going to go over something many players also debate on — Partners and Special Moves/Star Powers in both TTYD and Paper Mario. However, we did things a little differently.
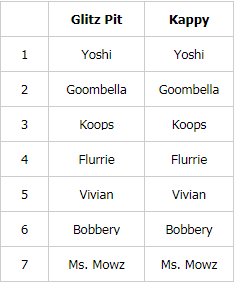
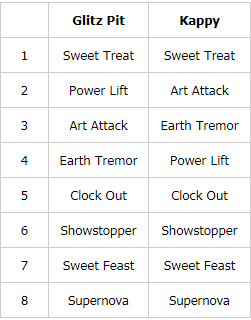
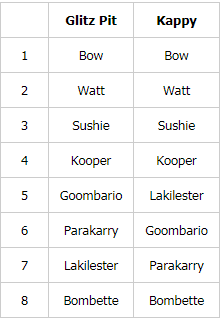
Instead of giving a tier, we basically just rated the order of each from best to worst. While there are certainly “breaks” within these lists where partners could be placed in the same tier, we felt that an ordered list would work better for Partners and Special Moves/Star Powers given the small amount of each compared to badges. Of course, like with badges, the overall opinion of the 30+ players who voted and discussed these are a little different from mine. I’ll be showing you each list with my own ranking next to it, and talk about some key differences. Remember, the Glitz Pit list is framed with a challenge runner in mind. Let’s start with TTYD!

PARTNERS

2018-10-26 11_39_07-Just Sayin' - ryanklaproth@gmail.com - Evernote
There’s actually not much to say here — I voted with the majority. There was a lot of debate between Yoshi and Goombella, but in the end, Yoshi’s ability to hit everything for huge amounts of damage barely won out over Goombella’s superior single-target damage and versatility with Rally Wink. To me, Yoshi and Goombella could easily be seen as the best partner — it just depends on how you fight. I fight with partners, so Yoshi is better. Flurrie and Vivian were another hotly contested pair.

SPECIAL MOVES

2018-10-26 11_39_59-Just Sayin' - ryanklaproth@gmail.com - Evernote
The glaring difference here is my opinion of Power Lift. I think Power Lift is great but unnecessary. A lot of the time, you can get an adequate boost in power with, say, Double Dipped Items or even just a single Power Punch. This is especially true for bosses where you’re planning to take damage to achieve Danger/Peril. The DEF boosts can get in the way, and while you can avoid those, it makes your ATK boosts worse since you’re wasting time waiting for the arrows to appear. It does pair well with P-Up, D-Down (and the partner variant), though. That was really the only difference. Supernova taking last might be a bit of a surprise, but Art Attacks just outperforms it at almost every step.
Alright, those are the rankings for TTYD. Let’s dive into 64!

PARTNERS

2018-10-26 11_40_13-Just Sayin' - ryanklaproth@gmail.com - Evernote
The big difference is the 5-7 spots. To be honest, these were big toss-up votes for a lot of people. While Parakarry is solid damage all-around and useful early-game, I rarely use him because Sushie does basically the same things he does but better. Air Lift is nice, but… Water Block is much better, and Lakilester has an AoE version. Goombario is uncontested in single-target damage, but it’s barely needed and requires Ultra Rank. Lakilester has Cloud Nine, a move that’s better than all 3 Lucky Badges combined in terms of evasiveness and he’s got a full-screen clean-up move in Spiny Surge, but I’ll be honest — I don’t use him often.

STAR POWERS

2018-10-26 11_40_47-Just Sayin' - ryanklaproth@gmail.com - Evernote

The big difference is my Refresh > Star Storm and Time Out > Smooch. I think Star Storm is great, but when it comes to dealing damage Mario usually has it covered. Refresh is useful throughout the game and is a key component in more restrictive runs. As for Time Out > Smooch — while Time Out really isn’t that great to begin with, I think the healing provided by Smooch coupled with its cost just isn’t really worth it. More than Up & Away, but I’d rather inflict status. There was quite the debate over some of the middle locations — partly because, well…you don’t really need any besides the first 3; they just out-class the rest super hard. For me, I’d take status > 20 HP heal, especially when that’s readily available with items. Refresh at least is only 1 SP and can be used multiple times with lower HP amounts (which challenge runners tend to have rather than going for 25+).

And that’s it for TTYD/64 Partners and Special Moves/Star Powers! We’re now on 64 Badges, so expect another post in the future once that’s been completed. Do you agree or disagree with these lists? Let me know in the comments below, on Twitter, or on Facebook! And that post I mentioned in my badge tier list is coming! I swear!

Link to Glitz Pit Server: https://discord.gg/0yohFnSHDvBexU7i

Just Sayin’

Paper Mario Talks — Kappy’s TTYD Badge Tier List (& comparison to Glitz Pit Tier List)

Over the past few months, the Glitz Pit Discord Server (link at the end of this post) has been debating and voting on how good and how bad badges in Paper Mario: The Thousand-Year Door are. Finally, this past week, discussion on badges has completed, and while we’re moving forward with partners in Paper Mario: The Thousand-Year Door, I thought I’d share that list alongside how I personally ranked every badge.

See, we had some 30+ players voting in the Glitz Pit, and all votes were taken and boiled down to a score. However, because of this, some votes for each player for certain badges differ from what is shown on the Glitz Pit. Obviously, this is to be expected; I, of course, have some pretty varied opinions on some badges, so let’s compare how I’d rate them to how the Glitz Pit rated them!

Before we do that, let’s categorize what each tier means (taken directly from the Glitz Pit on ranking badges):

S Tier — Well above average
A Tier — Above average
B Tier  — Slightly above average
C Tier — Average
D Tier — Slightly below average
E Tier — Below average
F Tier — Well below average

Now, F Tier badges aren’t “unusable”…generally speaking, S-B tier are badges you’ll likely keep equipped a good portion of the time, while C-F are more niche picks and filler.

First, let’s take a look at the Glitz Pit’s ranking. A few things to note are that, because of the aggregate of votes, there are +/- categories in each tier to represent a high/low end. SS = S=, and FF = F-. Badges within each tier aren’t listed in any order — they were basically listed by the order we voted them in.

glitz-pit-rankings

Now, here’s mine. I don’t really care what’s on the high or low end of a tier, so I didn’t include those. That also means I have no SS or FF tier. This is basically a list of how I voted for these badges during the rankings, so keep that in mind. They’re sorted in the order we voted them in per tier.

tierlist

I’ll talk about a few key differences:

Power Rush (GPRB: S; Kappy: A) — Yeah, I’m assuming heads will spin here. While, obviously, this badge is one of the most potent in the game and Danger Mario is easily the most optimal and broken strategy, we were rating them as if you could only get 2. In that context, I voted for A, because 2 Power Rush badges just aren’t as good as 1 Mega Rush. 2 BP for +4 vs 1 BP for +5, and with how easy it can be to get into Peril if you know what you’re doing, it’s really not an issue of difficulty when it comes to manipulating HP.

Fire Drive – (GPRB: A; Kappy: S) — This one’s a weird one. I’ve already explained why Fire Drive is in my Top 10 Badges in TTYD in my video on the subject, so I’ll defer to that for my explanation, but to summarize — my S vote comes from how this badge enables the possibility of ultra-hard challenges like 10 HP Prologue Pit, 10 HP No Mega Rush P Pre-Hooktail Pit, etc…

Double Dip (P) (GPRB: B+ [both]; Kappy: S [both]) — Again, another set where my video explains my reasoning here. I like free actions, and this badge provides them in spades for items. Many players felt they didn’t really need it, but I feel it’s an invaluable resource that makes set up ultra fast, ultra easy, and ultra awesome.

Power Jump (GPRB: C; Kappy: B) — Power Jump is actually a great option for early-game and with Flower Savers can be an amazing (and more damaging for a portion of the game) alternative to Spin Jump when stacked with 2 of them. I’d pick this over Spin Jump until you either get Ultra Boots or until you’ve got a couple ATK+ badges, especially against enemies with even 1 DEF. It’s an aerial hammer-esque move for Jump!

Pity Flower (GPRB: E-; Kappy: F) — A lot of casual players know this badge is pretty bad, si it might come as a surprise that the collective challenge run community got it into E tier (albeit on the lower end). While I voted F, I can actually understand how it ended up here, since when looking at other F Tier badges, this one can have niche use.

Those are the big differences I wanted to comment on, and that’s it for this post. What do you think of each list? Agree, disagree? Let me know in the comments below, or on Twitter, or on Facebook!  I swear I’ve got something new coming for this blog for Paper Mario Talks soon. I should be releasing another post in early October comparing Items and Star Power/Special Moves!

Just Sayin’

Paper Mario Talks — Pro Mode & Hammer

Continuing with gushing about things I like in my last post about Pre-Hooktail Pit Runs, today’s topic covers something I found exceptionally interesting in Paper: Mario Pro Mode, and that’s how you approach The Master.

If you’re unaware, someone by the name of Clover created a mod of Paper Mario that enhances its difficulty. Enemies do double damage, badge costs have changed, FP costs have changed, new enemy layouts, smart AI, new areas to explore… it’s quite a lot of new content. If you’re curious, click here to check out the release trailer that contains a link to download!

Anyway… one boss, in particular, stood out to me in Pro Mode, and that was The Master. His entire gimmick was changed – he now starts at 0 ATK (first form) / 1 ATK (second form) / 2 ATK (final form) for his basic attack (his combo moves have set damage), and with every strike you inflict on him, his ATK for the basic attack increases by 1. This means a Jump increases his ATK by 2, and Hammer by 1. I’m sure you see where this is going, but let me explain: this new gimmick actually makes Hammer a more viable choice than Jump when fighting him.

In 64 and TTYD, Jump is generally vastly superior to Hammer. It has generally better badges (Multibounce, Sleep/Shrink/Dizzy Stomp, Power Bounce) and nets a greater increase in power when you increase your attack because the attack of both Jumps are increased when you perform a successful Action Command. So, essentially, your ATK for Jump is doubled when compared to Hammer. The only thing Hammer has going for it is against high-DEF enemies and challenge runs that restrict your badges…but most of the time, your partners are there to help clean up. It’s much more effective to rely on Jump than Hammer almost every time. I will note that the Hammer is inherently better in 64 than in TTYD thanks to awesome badges like Power Power Quake, which are souped up Quake Hammers that can easily out-damage Multibounce, but for single targets like bosses, Jump still reigns supreme. However, The Master in Pro Mode turns that on its head.

Because of his unique gimmick, the battle is more about maximizing single hit damage so you can better control how much damage he’s inflicting. You can’t attack The Master recklessly. You need to make sure you’re doing the most damage with every strike to maximize your own damage and minimize his. With Mario’s Hammer, you can more smoothly increment The Master’s damage output to manipulate your HP into Danger or Peril, and using Charge makes sure you’re doing 10+ damage per hit with Hammer and Power Smash or Mega Smash. This makes Hammer a much more viable choice. You need seriously beefed up Jump to match what the Hammer can do, and even then, you’ll have a much harder time manipulating his ATK if it’s always increasing by 2. Honestly, I’m impressed with his design, because Mario’s Hammer being superior carries through for all 3 forms of The Master. It’s a strange concept to grasp. Almost every other boss I fought had me using some combination of D-Down Jump, Spike Shield, Ice Power, and ATK-increasing badges. The Master was the only boss to make me choose Hammer over Jump.

And yes, you could use Power Jump or Mega Jump… but the Hammer itself costs no FP, and The Master has DEF as he grows stronger, so D-Down Pound becomes a viable choice in his later forms. Besides, those two specific Jump badges are Hammer-esque in how they work anyway!

That’s my short spiel on The Master in Pro Mode and why I like it so much. I wish more bosses made Hammer a clearly superior choice over Jump.

Just Sayin’

Paper Mario Talks — Why Pre-Hooktail Pit is the Perfect Challenge

There are many, many challenges in Paper Mario: The Thousand-Year Door — Level Zero, No Jump No Hammer, Single Partner, BP Only, Double Damage, etc… but one among them all stands the test of time, for me, as the best TTYD challenge out there. That challenge…is Pre-Hooktail Pit.

A Pre-Hooktail Pit run is a run where the player completes the Pit of 100 Trials before completing Chapter 1, which is done by defeating Hooktail. Back in the old challenge running days, this was considered one of the top challenges. Today, I consider it to be one of the “gatekeeper” challenges, a challenge that breaks you into the higher tier of Paper Mario players. Despite my labeling it as a “gatekeeper” challenge, I think it’s the perfect challenge for upcoming challenge runners and veterans alike. Here’s why:

1) It tests everything

Remember my first blog post for Paper Mario Talks? I talked about the 4 skills of a challenge runner. Well, this challenge tests every single one of them and does so in an amazing way. You need to manage peril’d partners, choose the right badges/items for the job, work with on-the-fly RNG, and figure out strategies for all the various enemy loadouts you’ll encounter. Sometimes, you’ll be put in a tight spot and need to superguard and guard well or execute good Power Bounces, Multibonks, and Sweet Treats. Seriously, no other challenge tests everything at the same time so much.

What separates this from a challenge like Level Zero is it also tests your endurance. In full-game runs, you have the luxury of saving and quitting, only doing bite-sized chunks of the challenge. Pre-Hooktail Pit (and other Pit of 100 Trials challenges in general) provide no such luxury. You have to go through the whole thing, including Bonetail, before it is truly complete. And while I don’t consider endurance a particular skill of a Paper Mario challenge runner, it certainly is a skill that any player can benefit from. If you get too tired, you can start committing silly mistakes that can cost you a run.

2) It’s modular

Pre-Hooktail Pit is only the base form of its type of challenge. One can also choose to up the difficulty by including extra restrictions such as 10 HP (Mario cannot increase his HP above 10 in any way) or No Mega Rush P (cannot equip the badge Mega Rush P). You can also combine the two to create a devilishly difficult 10 HP No Mega Rush P restriction. All three of these add to the difficulty, but don’t take away too much from what it’s testing of the player. They all require a little more superguarding, but other than that they function mostly the same, and so provide a good stepping stone of challenges to attempt as you improve as a player. This is what allows newer challenge runners and veterans to continue performing this challenge.

What’s more, speedrunning the base form of the challenge is somewhat popular, and tests the player in a completely different way since you don’t have time to loaf around and prepare – you need to think on your metaphorical feet much faster than someone going through a normal Pre-Hooktail Pit run, who has all the time in the world to figure out a solution. While it’s a little too RNG-heavy to be a completely legitimate speedrun, it is a cool and interesting take on the challenge.

Now, other full-game challenges are also modular (it’s a nice thing about TTYD’s challenges – many are modular), but I particularly like the increase in difficulty the different restrictions of Pre-Hooktail Pit provide without sacrificing something. Many of the “step ups”, so to speak, of full game challenges omit or heavily downplay something crucial in terms of skills being used.

3) There are multiple ways to complete it

While most players follow a general rough guideline on stats, badges, and items to bring, the challenge itself can be completed in a myriad of ways. Some players will choose Heart Finder or Item Hog, Quick Change or Power Plus, Pretty Lucky or Close Call, etc… some decide to upgrade Goombella, others decide to upgrade Koops (or both!). Some will bring Life Shrooms, others will bring Courage Shells, Fire Flowers, POW Blocks, Mushrooms… in short, there’s a lot of variety depending on the player’s preference, and it changes how the run is tackled. While some strategies are definitely better than others, there are enough viable strategies to keep the run fresh and exciting for new players looking to enter challenge running and for veterans to try new things when doing the run.

Again, lots of full game runs offer this same level of variety, but I think an important distinction to make here is that many strategies will be developed on-the-fly that will vary. While you have time to prepare in a Pre-Hooktail Pit run, you have to work around your preparations in case something goes wrong. When you’re really only fighting bosses, you can prepare very well and not have to worry about something going wrong impacting your strategy too much.

And, well…that’s really all I have to say on the subject. I do want to say that most challenges, full game and Pre-Hooktail Pit, are very good, barring a select few I don’t think test all the skills I’d want it to. but if you ever want to get into the next tier of Paper Mario players, Pre-Hooktail Pit is a perfect place to start. There is no better challenge run. Give it a try!

Just Sayin’
Paper Mario Talks — How To Break Combat (64): Status

In Paper Mario, there are six kinds of status that the player can inflict on an enemy (Dizzy, Stop, Paralyze, Sleep, Shrink, Attack Down). Let’s take a look at them and how to inflict them!

Attack Down – Reduces an enemy’s attack by 3 for 4 turns. [Chill Out]
Dizzy – Opponent cannot move for x turns (varies by enemy). [Dizzy Dial, Dizzy Shell, Dizzy Stomp]
Paralyze – Opponent cannot move for x turns (varies by enemy). [Power Shock, Mega Shock]
Shrink – Opponent’s damage is halved for x turns. [Shrink Stomp]
Sleep – Opponent cannot move for x turns (varies by enemy). [Sleepy Sheep, Sleep Stomp, Lullaby]
Stop – Opponent cannot move for x turns (varies by enemy). [Stop Watch, Time Out]

For your information, the range of status where it lasts for x turns can vary from 1 – 4 turns.

Of these six, four of them do the exact same thing – hinder an enemy from moving. Without any differences (attacking a sleeping opponent does not wake them up, for instance), these statuses all cripple opponents in the same way, making combat in 64 very simple – find an enemy’s weakness to an immobilizing status and exploit it.

While I enjoy using status, and I consider knowing when and where to utilize status as a key element in strategy in Paper Mario and Paper Mario: The Thousand-Year Door, the monotony of what status do in 64 makes combat really easy. Furthermore, because so many status do the same thing, you can effectively lock an enemy into status and prevent them from ever attacking if they’re weak to two different kinds or very weak to one. Compare this to TTYD, where Dizzy no longer immobilizes enemies, Paralyze doesn’t exist, and enemies can wake from Sleep after being attacked; there’s much more variety, and you can’t really prevent enemies from attacking.

Now, while status is pretty broken in 64, the ability to inflict the same condition with so many different status does have its few benefits, but that mostly applies to challenge running. If you’re trying to inflict status to start setting up with, say, Super Jump Charge, you can cycle between an item/badge and Dizzy Shell or Power Shock to try and get a status inflicted sooner. It’s a cool concept, but that’s really all I find cool about the monotony of status in 64. This specific brand of status monotony is also why really hardcore challenges can be beaten in 64.

Let’s take a small turn and focus on the other two status, Shrink and Attack Down, which both reduce damage Mario takes. As you saw in my previous post, Chill Out’s Attack Down status is ridiculous. For 4 turns, an enemy has -3 ATK. That’s a big deal for the Tank Mario build and for just longevity in general. It cripples enemies in a different way. Sure, they can attack, but doing no damage is the same as not attacking at all (except for the ones that inflict status on Mario, but let’s not talk about those…). To supplement Tank Mario even more is Shrink, which halves an enemy’s damage. Halves. That’s Last Stand without having Last Stand active! With Last Stand and Shrink active, you’d be hard-pressed to find something that can damage Mario besides Final Bowser.

Speaking of… I find Bowser really interesting. Up until Bowser, every enemy in the game is stuck with their fate when inflicted with status. Bowser can remove status from himself (including Attack Down!!) with the Star Rod buff, and is the only enemy capable of removing status on Mario and his Partners. The entire game, you’re used to being able to do pretty much whatever you want, and then Bowser turns that on its head. It’s probably why I find him such a fun and interesting boss, and also why he really ramps up the difficulty curve when it comes to challenge running. But, we can talk about Bowser another time.

Anyway, the bottom line is…status is broken in 64. Even superbosses in Paper Mario: Pro Mode can’t prevent you from status-locking them. And while it’s cool to do that and be rewarded for using different status, I wish there had been more variety because just selecting a different item to do the same thing to an enemy can get a little stale.

Just Sayin’