This blog post will serve as a reference page for all written Kappy Spotlight posts on this blog for quick and easy access.
Tag Archives: Sayin’
Paper Mario Talks — Kappy’s Partner & Special Move/Star Power Tier Lists (+ comparison to Glitz Pit lists)
PARTNERS
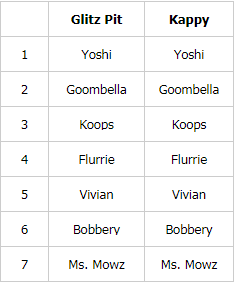
SPECIAL MOVES
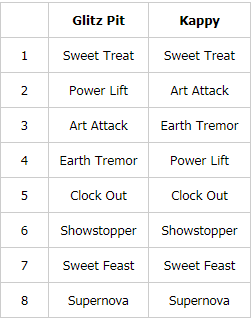
PARTNERS
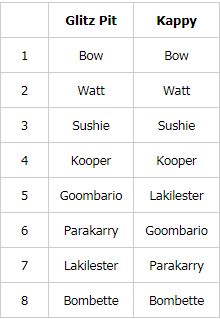
STAR POWERS
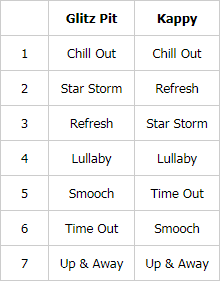
The big difference is my Refresh > Star Storm and Time Out > Smooch. I think Star Storm is great, but when it comes to dealing damage Mario usually has it covered. Refresh is useful throughout the game and is a key component in more restrictive runs. As for Time Out > Smooch — while Time Out really isn’t that great to begin with, I think the healing provided by Smooch coupled with its cost just isn’t really worth it. More than Up & Away, but I’d rather inflict status. There was quite the debate over some of the middle locations — partly because, well…you don’t really need any besides the first 3; they just out-class the rest super hard. For me, I’d take status > 20 HP heal, especially when that’s readily available with items. Refresh at least is only 1 SP and can be used multiple times with lower HP amounts (which challenge runners tend to have rather than going for 25+).
And that’s it for TTYD/64 Partners and Special Moves/Star Powers! We’re now on 64 Badges, so expect another post in the future once that’s been completed. Do you agree or disagree with these lists? Let me know in the comments below, on Twitter, or on Facebook! And that post I mentioned in my badge tier list is coming! I swear!
Just Sayin’
Paper Mario Talks — Kappy’s TTYD Badge Tier List (& comparison to Glitz Pit Tier List)
See, we had some 30+ players voting in the Glitz Pit, and all votes were taken and boiled down to a score. However, because of this, some votes for each player for certain badges differ from what is shown on the Glitz Pit. Obviously, this is to be expected; I, of course, have some pretty varied opinions on some badges, so let’s compare how I’d rate them to how the Glitz Pit rated them!
Before we do that, let’s categorize what each tier means (taken directly from the Glitz Pit on ranking badges):
S Tier — Well above average
A Tier — Above average
B Tier — Slightly above average
C Tier — Average
D Tier — Slightly below average
E Tier — Below average
F Tier — Well below average
Now, F Tier badges aren’t “unusable”…generally speaking, S-B tier are badges you’ll likely keep equipped a good portion of the time, while C-F are more niche picks and filler.
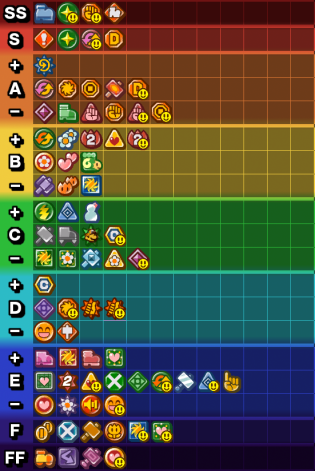
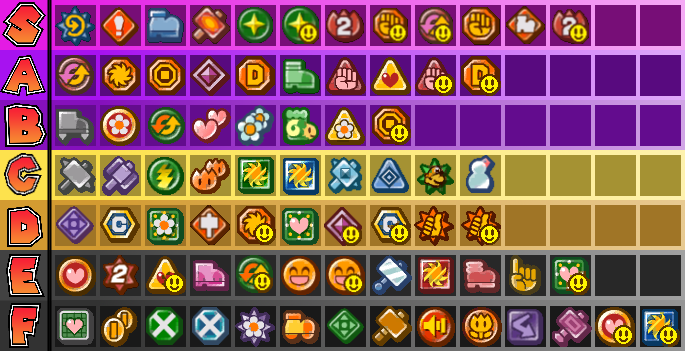
I’ll talk about a few key differences:
Power Rush (GPRB: S; Kappy: A) — Yeah, I’m assuming heads will spin here. While, obviously, this badge is one of the most potent in the game and Danger Mario is easily the most optimal and broken strategy, we were rating them as if you could only get 2. In that context, I voted for A, because 2 Power Rush badges just aren’t as good as 1 Mega Rush. 2 BP for +4 vs 1 BP for +5, and with how easy it can be to get into Peril if you know what you’re doing, it’s really not an issue of difficulty when it comes to manipulating HP.
Fire Drive – (GPRB: A; Kappy: S) — This one’s a weird one. I’ve already explained why Fire Drive is in my Top 10 Badges in TTYD in my video on the subject, so I’ll defer to that for my explanation, but to summarize — my S vote comes from how this badge enables the possibility of ultra-hard challenges like 10 HP Prologue Pit, 10 HP No Mega Rush P Pre-Hooktail Pit, etc…
Double Dip (P) (GPRB: B+ [both]; Kappy: S [both]) — Again, another set where my video explains my reasoning here. I like free actions, and this badge provides them in spades for items. Many players felt they didn’t really need it, but I feel it’s an invaluable resource that makes set up ultra fast, ultra easy, and ultra awesome.
Power Jump (GPRB: C; Kappy: B) — Power Jump is actually a great option for early-game and with Flower Savers can be an amazing (and more damaging for a portion of the game) alternative to Spin Jump when stacked with 2 of them. I’d pick this over Spin Jump until you either get Ultra Boots or until you’ve got a couple ATK+ badges, especially against enemies with even 1 DEF. It’s an aerial hammer-esque move for Jump!
Pity Flower (GPRB: E-; Kappy: F) — A lot of casual players know this badge is pretty bad, si it might come as a surprise that the collective challenge run community got it into E tier (albeit on the lower end). While I voted F, I can actually understand how it ended up here, since when looking at other F Tier badges, this one can have niche use.
Those are the big differences I wanted to comment on, and that’s it for this post. What do you think of each list? Agree, disagree? Let me know in the comments below, or on Twitter, or on Facebook! I swear I’ve got something new coming for this blog for Paper Mario Talks soon. I should be releasing another post in early October comparing Items and Star Power/Special Moves!
Just Sayin’
Paper Mario Talks — How To Break Combat (64): Status
In Paper Mario, there are six kinds of status that the player can inflict on an enemy (Dizzy, Stop, Paralyze, Sleep, Shrink, Attack Down). Let’s take a look at them and how to inflict them!
Attack Down – Reduces an enemy’s attack by 3 for 4 turns. [Chill Out]
Dizzy – Opponent cannot move for x turns (varies by enemy). [Dizzy Dial, Dizzy Shell, Dizzy Stomp]
Paralyze – Opponent cannot move for x turns (varies by enemy). [Power Shock, Mega Shock]
Shrink – Opponent’s damage is halved for x turns. [Shrink Stomp]
Sleep – Opponent cannot move for x turns (varies by enemy). [Sleepy Sheep, Sleep Stomp, Lullaby]
Stop – Opponent cannot move for x turns (varies by enemy). [Stop Watch, Time Out]
For your information, the range of status where it lasts for x turns can vary from 1 – 4 turns.
Of these six, four of them do the exact same thing – hinder an enemy from moving. Without any differences (attacking a sleeping opponent does not wake them up, for instance), these statuses all cripple opponents in the same way, making combat in 64 very simple – find an enemy’s weakness to an immobilizing status and exploit it.
While I enjoy using status, and I consider knowing when and where to utilize status as a key element in strategy in Paper Mario and Paper Mario: The Thousand-Year Door, the monotony of what status do in 64 makes combat really easy. Furthermore, because so many status do the same thing, you can effectively lock an enemy into status and prevent them from ever attacking if they’re weak to two different kinds or very weak to one. Compare this to TTYD, where Dizzy no longer immobilizes enemies, Paralyze doesn’t exist, and enemies can wake from Sleep after being attacked; there’s much more variety, and you can’t really prevent enemies from attacking.
Now, while status is pretty broken in 64, the ability to inflict the same condition with so many different status does have its few benefits, but that mostly applies to challenge running. If you’re trying to inflict status to start setting up with, say, Super Jump Charge, you can cycle between an item/badge and Dizzy Shell or Power Shock to try and get a status inflicted sooner. It’s a cool concept, but that’s really all I find cool about the monotony of status in 64. This specific brand of status monotony is also why really hardcore challenges can be beaten in 64.
Let’s take a small turn and focus on the other two status, Shrink and Attack Down, which both reduce damage Mario takes. As you saw in my previous post, Chill Out’s Attack Down status is ridiculous. For 4 turns, an enemy has -3 ATK. That’s a big deal for the Tank Mario build and for just longevity in general. It cripples enemies in a different way. Sure, they can attack, but doing no damage is the same as not attacking at all (except for the ones that inflict status on Mario, but let’s not talk about those…). To supplement Tank Mario even more is Shrink, which halves an enemy’s damage. Halves. That’s Last Stand without having Last Stand active! With Last Stand and Shrink active, you’d be hard-pressed to find something that can damage Mario besides Final Bowser.
Speaking of… I find Bowser really interesting. Up until Bowser, every enemy in the game is stuck with their fate when inflicted with status. Bowser can remove status from himself (including Attack Down!!) with the Star Rod buff, and is the only enemy capable of removing status on Mario and his Partners. The entire game, you’re used to being able to do pretty much whatever you want, and then Bowser turns that on its head. It’s probably why I find him such a fun and interesting boss, and also why he really ramps up the difficulty curve when it comes to challenge running. But, we can talk about Bowser another time.
Anyway, the bottom line is…status is broken in 64. Even superbosses in Paper Mario: Pro Mode can’t prevent you from status-locking them. And while it’s cool to do that and be rewarded for using different status, I wish there had been more variety because just selecting a different item to do the same thing to an enemy can get a little stale.
Just Sayin’
Paper Mario Talks — An Examination of Danger Mario
When Mario is at 5 HP or less, he’s in what’s known as Danger. If he has 1 HP, he’s in Peril. In Paper Mario and Paper Mario: The Thousand-Year Door, there are badges that only activate when you’re in Danger or Peril. These badges are as follows:
— Close Call (and partner variant) [Increases chance of enemies missing]
— Last Stand (and partner variant) [Halves damage Mario takes]
— Power Rush (and partner variant) [Increases damage Mario deals by 2]
— Mega Rush (and partner variant) [Increases damage Mario deals by 4 (64) / 5 (TTYD)]
These 4 badges are quite powerful and represent a “last chance” kind of effort for the player. It allows them to win by the skin of their teeth in normal gameplay, especially if you have Mega Rush equipped, which only activates when Mario’s in Peril. However, if a player is upgrading HP often, these badges become less useful because you can go entire battles without it activating. On the flip side… there is a badge setup known as Danger Mario. A character in both games called Chet Rippo allows Mario to swap stats around. This makes it possible to make Mario’s HP 5 instead of 10, effectively putting him in permanent Danger. This is the basis of Danger Mario, and it enhances these 4 badges beyond their normal usefulness.
Now, Danger Mario is quite notorious. Many players frown upon it, saying it’s powerful, but not fun. I’m inclined to agree, but I’ll save my opinions for later. For now, let’s jump into what makes Danger Mario so good. Let’s break down TTYD’s first, as it’s the one most well-known as the “Danger Mario” build.
There are quite a few builds of Danger Mario in TTYD. The first one is the most common: hyper offense.
Here’s the setup:
Hyper Offense Danger Mario
– FP Plus
– Spike Shield
– Ice Power
– Multibounce
– Power Bounce
– Quake Hammer
– Power Rush x20+
Now, you’re thinking “20+ Power Rushes? What??” Well, in the Pianta Parlor, you’re able to buy badges for tokens you win while at the parlor. One of them happens to be Power Rush. Buy enough, and you can make Mario a monster, dealing up to 99 damage per Jump if you buy and equip enough. With Spike Shield and Ice Power, Mario can jump on any enemy barring those on the ceiling, but that’s what Quake Hammer is for. Multibounce allows you to OHKO basically every enemy, and Power Bounce lets you destroy bosses in one turn. Truly, this is Mario’s most powerful form offensively.
This specific setup is the one everyone knows about. There are plenty of videos of it online. The reason it’s so powerful is that you can stack badges in TTYD, and there’s an infinite supply of Power Rush badges for Mario to equip. The other three badges can be stacked, but you need to grind badge drops from enemies, making builds focused around stacking them more tedious to implement. The other one I’ve seen used often is one with a bunch of Close Calls, which makes Mario an evasion tank that will never be hit.
Now let’s look at 64’s Danger Mario. Unlike in TTYD, you’re only able to get one of each badge. But, Last Stand functions differently in 64. Instead of being last in the damage calculation and rounding the damage taken up, Last Stand comes before Guarding & Damage Dodges, and rounds down. This is a significant difference and makes Danger Mario in 64 much more potent defensively than TTYD’s. It’s the only Danger Mario setup that can successfully use a Peril Mario setup.
Now, an offensive build in 64 is actually not incredibly potent. While you have Jump Charge/Hammer Charge, Mega Rush and Power Rush don’t stack with each other like they do in TTYD. Furthermore, Mega Rush only increases your ATK by 4. Without any other badges, you’re sitting at only 7 damage with Ultra Boots. Couple in the lack of partners using items AND lack of ATK-increasing items, and your only real way of powering up is Watt’s Turbo Charge, which makes your ATK 8. No, offense isn’t what makes Danger Mario in 64 so potent. It’s Mario’s defensive setup. Let’s look at Tank Mario.
Here’s the build skeleton:
Tank Danger Mario
– Last Stand
– Damage Dodge x2
– Defend Plus
– P-Down, D-Up
– Fire Shield
Without Last Stand active, Mario’s current DEF is 2. With a Guard and two Damage Dodges, Mario can reduce his total damage taken by 5. If you add in Sushie’s Water Block, that total is now 6. With Chill Out, it’s 9. If the move is a Fire move, Fire Shield blocks that for an extra 1 point of damage. Now, since Last Stand comes before guarding, a move reduced by Last Stand can have its damage output effectively reduced by 6 (7 for a fire move) before Last Stand takes effect.
Let’s see what Mario’s taking before he guards with Last Stand active!
- Final Bowser’s Flame Breath (10) -> 3 / 2 -> 1
- No Chill Out = 6 / 2 -> 3
- No Water Block = 7 / 2 -> 3
- No Chill Out = 6 / 2 -> 3
- Final Bowser’s Lightning Blast (10) -> 4 / 2 -> 2
- No Chill Out = 7 / 2 -> 3
- No Water Block = 8 / 2 -> 4
- No Chill Out = 7 / 2 -> 3
- Star Rod Powered Final Bowser Flame Breath** (20) -> 16 / 2 -> 8
- Huff N. Puff’s Full Power Ground Slam (15) -> 9 / 2 -> 4
- Huff N. Puff’s Ground Lightning* (12) -> 7 / 2 -> 3
- Anti Guy’s Flashy Attack (12) -> 6 / 2 -> 3
- No Chill Out = 9 / 2 -> 4
- No Water Block = 10 / 2 -> 5
- No Water Block = 7 / 2 -> 3
- No Chill Out = 9 / 2 -> 4
*Huff N’ Puff’s Lightning Attacks go through Water Block’s 1 DEF increase.
**When Bowser has the Star Rod active, Chill Out will not work on him.
Look at that damage! Because no attacks pierce in 64, everything is affected by all DEF boosts Mario has. Now, let’s factor in Guarding and Damage Dodges!
- Final Bowser’s Flame Breath = 0 damage
- No Chill Out = 0 damage
- No Water Block = 0 damage
- No Chill Out = 0 damage
- Final Bowser’s Lightning Blast = 0 damage
- No Chill Out = 0 damage
- No Water Block = 1 damage
- No Chill Out = 0 damage
- Star Rod Powered Final Bowser Flame Breath = 5 damage
- Huff N. Puff’s Full Power Ground Slam = 1 damage
- Huff N. Puff’s Ground Lightning = 0 damage
- Anti Guy’s Flashy Attack = 0 damage
- No Chill Out = 1 damage
- No Water Block = 2 damage
- No Water Block = 0 damage
- No Chill Out = 1 damage
So, with 6 badges equipped, Mario has successfully negated damage from all but a few attacks, and some don’t even need Water Block or Chill Out! The only move that truly defeats him is Final Bowser’s Flame Breath while being boosted with the Star Rod. That’s an insanely tanky Mario. Even without the extra badges increasing DEF, Last Stand rounding down coupled with Chill Out or Water Block can cripple most enemies and bosses for practically the whole game. And, unlike TTYD where you have to wait until after Chapter 5 to access permanent Danger Mario, you can access permanent Danger as early as pre-Chapter 2 in 64. You also don’t need to stack any badges to achieve this level of defensive prowess.
With only 6 badges equipped, you have more than enough BP to equip some badges that boost ATK, D-Down Jump, Flower Saver, HP Drain, and more! You can also equip Dodge Master for easier guarding. With this setup, Mario can basically emulate superguarding from TTYD by equipping Zap Tap and tanking his way through enemies.
So, now that we’ve broken down common builds of Danger Mario and how they function, what do I think of Danger Mario? I think 64 definitely has the more broken Danger Mario. It requires no grinding for stackable badges and only requires a few badges to be truly terrifying. Even Last Stand alone is ridiculous, and because Chill Out exists, it just cripples enemies.
And yet, for how broken 64 Danger Mario is, I find it fun to use when it’s needed. Using only 1 of each badge forces more strategic thinking and planning in both games. And with the exclusion of items like Point Swap and Trial Stew in 64, it becomes even more pronounced. And, because most damage is moderately high from more deadly enemies if you miss a guard, there’s still a feeling of tension. You can’t mindlessly run through the game Multibouncing everything in sight with +40 ATK. If you miss a couple guards, you’ll probably game over. I feel the same way about TTYD, but like I said earlier, that only applies with 1 of each badge equipped. Stacking a ton of them can be fun once just to see Mario run a train through every enemy and boss left, but being a challenge runner, I prefer being challenged and not mindlessly playing. Although, I will say I think the evasion tank build is quite hilarious and cool, and am a fan of it over the hyper offense setup.
All that being said, I do tend to stay away from Danger badges – especially Mega Rush in TTYD and Last Stand in 64 – if I can help it, but I’ll use them if I need to. Sometimes, the most elegant or most creative strategies require them.
Also, Close Call is incredible. Seriously.
Just Sayin’
Paper Mario Talks — Skills of a Paper Mario Challenge Runner
Coffee…Check.
Fingers and hand stretched…Check.
Paper Mario information…Check.
I think I’m ready.
Welcome to Paper Mario Talks! In this new series, I’ll be exploring various areas of the Paper Mario series as it relates to gameplay, game design, and challenge running! I have a lot of opinions on this series that I haven’t really expressed to, well…anyone! So, what better way to talk about the series I love the most than through blog posts and videos!
Oh, yeah, there’ll be videos, too! They’ll be available on my YouTube channel. Here’s how it’s going to break down: these posts will be more in-depth into various topics of the series that I want to write about, and the videos will be more focused on my favorite/least favorite badges/partners/etc…
Paper Mario Talks will be more focused on Paper Mario and Paper Mario: The Thousand-Year Door; the reason will be a topic all of its own!
To begin this series, I want to bring to light what challenge running is so that you know what angles I’m coming from. Unlike speedrunning, where the goal is to beat the game as fast as possible, challenge running aims to beat the game under certain conditions or with restrictions. This is to force a new style of gameplay or make the game harder. RPG’s are usually pretty great for these, as you can easily restrict certain items/attacks/level ups and change the way the game is played.
There’s a wiki detailing a lot of different challenges in the Paper Mario series to get you more familiarized with what I’m talking about. Check it out if you’re interested!
Anyway, today’s topic is about the core skills of a challenge runner in the Paper Mario series. There are four distinct skills I believe most great Paper Mario players are proficient in – execution, planning, game knowledge, and reactionary theory. Let’s define those:
Game Knowledge: How well you know enemies, their health, their stats, Mario’s abilities, partners’ abilities, boss AI, etc… This is an ever-growing skill until you’ve memorized everything. If you don’t know enough about the game, you can’t really improve the rest of your skills. However, it’s easy to improve this one – ask someone or look it up online. Besides Color Splash, the series is pretty old and has a lot of FAQs/guides dedicated to the other games in the series.
Planning: How well you can plan out a strategy for a given fight. If you know enough about a certain boss, you can plan turn-by-turn strategies around them. You can account for RNG and have a plan of attack no matter what the boss does. You can be adequately prepared for any kind of encounter. Theoretically, you can win fights before you even get to them! Everyone can plan to an extent, but truly remarkable players can optimize their strategies further.
Execution: This is Planning’s cousin. You can win fights before you even play them, but can you execute on your strategies and actually win the fight? Can you guard or superguard every attack you’re planning to? Can you hit all the necessary Action Commands? Planning & Execution go hand-in-hand with each other.
Reactionary Theory: Probably the trickiest of the skills challenge runners need. If your plan goes awry, how can you get back on track? Can you save the fight? If you encounter a certain enemy loadout that you weren’t expecting, can you formulate a plan for success? This kind of on-the-fly thinking is crucial to certain challenges and is great for when you messed up an Action Command or RNG truly shot down your strategy. This is the hardest skill to become proficient in.
These four together form the core of a great Paper Mario challenge runner. How I define these skills helps shape how I view challenge running – and by extension certain facets of the series – so I hope this helps shed some light on how I’ll be approaching the rest of the topics in Paper Mario Talks.
Just Sayin’

You must be logged in to post a comment.