Kappy’s Spotlight — Ms. Mowz

It’s that time again: #KappySpotlight time, where I talk about badges/items/partners/etc… that are generally seen as “bad” and not used very often by challenge runners. I dive deeper into why they’re perceived the way they are with some cool strategies centered around them mixed in! Today, I’ll be covering a partner in TTYD who’s…ugh, the worst: Ms. Mowz…


Ms._Mowz
Moves:
Love Slap — Deals piercing damage to a single enemy (2/3/4 damage) [Front only]
Kiss Thief [2 FP] — Steals enemies’ items and badges.
Tease [3 FP] — Inflicts Dizzy on enemies.
Smooch [10 FP] — Heals Mario for 10 HP.
Glitz Pit Rank: 7th (of 7 Partners)

Ouch, the worst of all partners, but it’s easy to see why. Ms. Mowz is not a combat-oriented partner, so of course she’s the worst, but that might be because she’s entirely optional. If you decide to pick her up, you’ll find subpar HP, lackluster damage, and the ability to steal things from enemies, which makes her worth it all on its own. Unfortunately, being able to steal things translates more to a switch in, steal, then switch out situation because her combat options are, well…terrible. They’re terrible. Let’s break down those moves!

LOVE SLAP

Love Slap isn’t bad, but it’s not great. It pierces, which is awesome, but it only does 4 at Ultra Ranking, meaning even with 1 DEF Bobbery, Vivian, and Flurrie are out-damaging it with their base moves. What really gets me here is that she can’t hit front-spiky or fiery enemies. Don’t get me wrong, others can’t either, but when this is her only move that deals damage. To add onto this, the Stylish command for this move doesn’t actually work. A lot is actively working against her here in this move. Still, the piercing can be quite good, and makes Ms. Mowz and easy third choice in Level Zero runs against Gloomtail, Bonetail, Grodus, Bowser, and the Shadow Queen behind Vivian and Bobbery!

KISS THEIF

Ms. Mowz actually has amazing utility in Kiss Thief. Being able to steal items and badges from enemies is no joke, especially if you get lucky and an enemy is holding a nice badge like P-Down, D-Up P, Power Plus, Close Call, Power Rush (P), etc… with extra badges that you can’t normally get, you can do a lot more than you normally could. Also, it never hurts to steal Life Shrooms, Boo’s Sheets, and the like if an enemy is holding it. You can even steal coins if an enemy isn’t holding anything, but that’s not really useful. For 2 FP, it’s absolutely worth it, and this move alone makes her worth picking up as a partner.

TEASE

Dizzy as a status isn’t amazing. It’s…okay, if not slightly underwhelming. So, Ms. Mowz has a move, like Vivian, that just inflicts status to all enemies, and it’s Dizzy. I’ll admit — I actually think this is better than Infatuation; the issue I have is that this move totally could’ve dealt light piercing damage as well and still function nearly the same while giving Mowz the ability to hit more enemies and get past the spiky/fiery enemy issue that Love Slap has…and, y’know, not only hit the front grounded enemy. Alas… this is an okay move to use in the Pit because a surprising amount of deep Pit enemies can be inflicted with Dizzy. If you don’t have Stop at the ready, this isn’t a bad alternative, and it’s only 3 FP.

SMOOCH

And here we are — the worst partner move in the game. For 10 FP, Mario recovers 10 HP. 10 FP. Can we let that sink in? 10. FP. What was going on when this move was created? It’s such a horrible heal for the FP cost. Even with two Flower Saver P badges, I wouldn’t use this move. Why? because I can Sweet Treat and get 7, or Double Dip two Mushrooms which is only 4 FP, or use a Super Shroom, or do literally anything else. Yeah, this move is bad. I understand that items are limited, but let’s be real… it’s her Ultra Rank move, and with only 10-20 HP, challenge runners don’t need to spend 10 FP to heal what a Super Shroom can or what Sweet Treat can basically heal. If this were less FP or healed way more, I’d consider it usable. EDIT: You can actually determine how much HP this move heals based on how much of the bar you fill, which makes this move much better than a flat 10 for 10. Still, you can probably accomplish the same healing with items rather than spending 10 FP.

Now that we’ve got that out of the way…let’s try a strategy out with Ms. Mowz! One that uses Smooch!

GLOOMTAIL STRAT
15 HP, 15 FP
BADGES: Jumpman, All or Nothing, Mega Rush, P-Up D-Down P, Power Rush P x2, Feeling Fine, Feeling Fine P, Flower Saver P x2, Double Dip P x2 (33 BP, 42 with two FP Plus and HP Plus)
ITEMS: Point Swap, Power Punch, Hot Sauce x2

Click here to see the strategy in action!

T1: Triple Dip (Hot Sauce x2 Mario, Point Swap Mario), Spin Jump (67) *Don’t Guard
T2: Spin Jump, Smooch (48) *Don’t Guard
T3: Jump, Power Punch Mario (32)
T4: Spin Jump, Love Slap [KO]

This strategy aims to have Mario get to every trigger with an attack starting Turn 2 and finish Gloomtail before he can attack with Megabreath. Look at all that BP we need! Let’s get into it:

In order to use Smooch and actually do some damage manipulation with Mario and Ms. Mowz, we needed Mario at 15 HP and can’t guard any attacks, or else Mowz won’t be at 5 HP T4. So, because Mario’s at 15, we need to get creative with how he’s getting into Peril. Luckily, Triple Dip costs 8 FP, down to 6 with two Flower Saver P badges, putting us at 9 FP, which is perfect for a Point Swap. We Point Swap and hand Mario two Hot Sauce badges to temporarily increase his attack with Spin Jump. Remember, Gloomtail’s got 80 HP, 8 ATK, and 2 DEF. We circumvented the DEF with Jumpman and All or Nothing, but we need to make sure we’re dealing 32 damage total Turn 2. After the swap, we’re at 15 FP again with Mario at 9 HP. We then Spin Jump, dealing 5 + 8 = 13 damage. We then opt to not guard Gloomtail’s breath and take 8 damage (Mowz 9 damage). Feeling Fine (P) prevents both from being poisoned. Now, Mario’s at 1, and Ms. Mowz is at 16 since Ms. Mowz at Ultra Rank has 25 HP total. Turn 2, we Spin Jump under Peril, but without the Hot Sauce since we burned them Turn 1. 8 + 11 = 19 damage, which, when adding with the 13 we dealt previously, is a perfect 32, putting Gloomtail at 48 and setting off his first HP trigger. We Smooch as well, putting Mario at 11 HP. Now, Gloomtail always uses Earthquake at 48 HP per his trigger, so he uses it, and deals 10 damage to Mario (11 to Mowz). Mario’s in Peril once again, and Mowz is in perfect Danger, sitting at 5 HP. Turn 3, we do a normal Jump (8 + 8 = 16 damage) to get Gloomtail to his next trigger at 32. We then give Mario a Power Punch for his next attack. As per his 32 HP trigger, Gloomtail charges up for Megabreath. Turn 4, we finish it. Spin Jump now does 10 + 13 = 23 damage, and Ms. Mowz is at 9 ATK thanks to the 5 from two Power Rush P badges and P-Up D-Down P. 23 + 9 = 32 damage total, and with a final Love Slap we take down Gloomtail, Mowz style!

I’ll be honest…coming up with strategies with Mowz can be quite the challenge, so I actually had some fun making this despite my distaste for Ms. Mowz as a battle partner. Maybe I’m just traumatized by my Ms. Mowz Only run…who knows, but what I do know is that she’s not good in combat, and basically everything she has is outclassed. Still, being able to steal things is cool, and is a utility no one else can boast, so even if you never use her in battle, I do suggest you always pick her up in any runs where you’ll be using badges and items!

Next time, I’ll be going back to 64. Will it be a badge? An item? A partner? You’ll have to wait and find out!

Just Sayin’

Advertisement

Kappy’s Spotlight — Bobbery

It’s that time again: #KappySpotlight time, where I talk about badges/items/partners/etc… that are generally seen as “bad” and not used very often by challenge runners. I dive deeper into why they’re perceived the way they are with some cool strategies centered around them mixed in! Today, I’ll be covering a partner in TTYD who’s bombastically underwhelming — BOBBERY!!

1200px-Bobbery1.png
Moves:
Bomb — Deals damage to a single enemy (4/5/6 damage) [Front only]
Bomb Squad [3 FP] — Throw 3 bombs that explode one turn later for 3 damage each.
Hold Fast [4 FP] — Inflicts half-damage back to physical attackers.
Bob-ombast [9 FP] — Damages all enemies (8 damage)

Glitz Pit Rank: 6th (of 7 Partners)

Unlike Paper Mario 64, Partners in TTYD serve different purposes and can be included in strategies since they can be hit and have many, many more badges that can affect them. As such, I will be sharing strategies for these partners.

Bobbery is sitting at the 2nd-to-last position on the Glitz Pit Tier List. Yikes. Besides his fantastic HP as a tank and good base damage, Bobbery suffers tremendously once everyone is upgraded to Ultra Rank and you start stacking ATK+ badges on them. He’s the 2nd best tank in the game with a massive 40 HP pool at Ultra Rank, but he’s too FP inefficient and doesn’t cover as many enemies as he’d like without bringing that FP inefficiency into play. Despite this, he’s great at Level Zero – probably the best option there thanks to his base HP and ATK – but that alone isn’t going to make up for it when contenders like Vivian, Flurrie, and Yoshi exist in Level Zero runs. He’s also got a really unique niche use as a way to clear Fog with his moves/Appeal. Let’s break those moves down:

BOMB

Bobbery’s Basic attack. 4 damage at Base rank is pretty great, but it’s basically a Hammer attack. It can only hit the front. Bonus points for him being able to flip Clefts with this move, though! It can also clear Fog. Unfortunately, because of partner balance Flurrie also gets to 6 at Ultra Rank, making Bobbery’s upgrades less impactful in terms of power. You’ll use this move if there’s a spiky enemy or a Cleft, but otherwise, you’ll stick with something stronger.

BOMB SQUAD

This is Bobbery’s ace in the hole but unfortunately is outclassed once you start stacking power. This move can be an incredible way to defeat certain bosses. Cortez, Smorg, and even Magnus Von Grapple 2.0/Grodus can all be disrupted heavily by Bomb Squad. You can also use it to skip a turn in Shadow Queen’s Phase 2, which can be invaluable, but ultimately is still niche since you can just KO them outright with well-planned strategies. Bomb Squad actually has an amazing niche in Impossible Mode, where it can be used to ultimately optimize turns since it’s the highest damage-dealing move in your arsenal that can hit multiple opponents. The biggest drawback to Bomb Squad is that it can’t have its damage increased by any badge that raises ATK, so it’s stuck at base 3
even at Ultra Rank. If it could be increased I guarantee Bobbery would be seen in a different light off this move alone, but alas.

HOLD FAST

The worst move by far in Bobbery’s arsenal. It’s literally the Return Postage badge as a partner move, and it’s not great. While the idea of having this move on the highest HP partner is good, the fact that many attacks later on aren’t direct attacks really sells the move short. Hard to justify it when basically every boss after Chapter 5 isn’t affected besides a select few moves, and you can’t double the damage Bobbery takes, so you’re forced to use a Spite Pouch to deal more damage. It’s just not good when you can do so much more.

BOB-OMBAST

This is probably Bobbery’s second-best attack behind Bomb Squad, and is actually quite good at Ultra Rank. 8 damage base is strong. Unfortunately, it costs 9 FP, meaning you’re really digging into your FP to use this move when fantastic moves like Shell Slam, Stampede, and Fiery Jinx are all 6 FP and can deal way more damage. This is basically diet Supernova that costs FP. It’s an explosion, so you can definitely get use out of it by flipping 4 Clefts or dealing extra damage to 5 Phantom Embers, but otherwise…well, you have better, more FP-efficient options.

Now, let’s look at a strategy with Bobbery featuring Bomb Squad!

CORTEZ STRAT

10 HP, 10 FP
BADGES: Jumpman, Power Plus x2, Power Bounce, Flower Saver (21 BP, 24 with FP Plus)
T1: Bomb Squad, Spin Jump (10)
T2: Bomb Squad, Spin Jump (0) -> Phase 2 -> (18) (16) [Gem now exposed] (10) (4) (0) -> Phase 3 -> (18)

T3: Power Punch Mario, Power Bounce (4 bounces) [KO]

This is a modified strategy from one of our Puzzle Challenges hosted on the Glitz Pit. I wanted to specifically show this strategy to expose it to others and show how cool Bomb Squad is. This is a really nice, clean strategy and I love it, so let’s jump in!

We’ve set up Mario so that a Spin Jump does 4+6 damage against Cortez, who has 3 phases with 20 HP each. He has 4 ATK and 1 DEF. Our goal here is to completely skip Phase 2 with Bomb Squad. So, with Super Boots, Mario’s Jump does 2+2, and Spin Jump does 2+4. With DEF, we’re at 1+3 on Spin Jump, so Jumpman and two Power Plus badges put him at 4+6. We’ll be using FP every turn, so we put on Flower Saver so that Mario’s Spin Jump is 1 FP and Power Bounce is 2 FP.

Turn 1, we Bomb Squad and Spin Jump so that Cortez is at 10. It doesn’t matter who he attacks since this is the only turn he’ll get to attack. Turn 2, we Bomb Squad first to ensure we have six bombs out, then Spin Jump again to end Cortez’s Phase 1. After he transitions to Phase 2, the bombs from Bomb Squad thrown Turn 1 explode. Cortez sinks once when the bone pile is attacked in Phase 2, and the bombs attack the bone pile, so he sinks once, then exposes his gem on the second bomb. Now, on the third bomb, the bomb hits both the bone pile and the gem. Cortez’s gem actually has -1 DEF, and Bobbery’s bombs from Bomb Squad have 3 ATK, so he takes 2 on the bone pile and 4 on the gem, resulting in 6 damage total and leaving him at 10 HP. Now, two more bombs go off because the bombs from Bomb Squad can actually set each other off, and with two more bombs Cortez’s Phase 2 ends before Turn 3 has even started. Remember, we’re still at the end of Turn 2! And finally, the last bomb goes off and inflicts 2 damage on Cortez.

Now, finally, Turn 3 starts after Phase 2 is completely skipped. We have 2 FP left after two Spin Jumps and two Bomb Squads (both costing 4 FP total per turn). We Power Punch Mario and perform a Power Bounce with four bounces. With a Power Punch, Mario’s base 4 (factoring in Cortez’s DEF) is now at 6. (6+5+4+3) = 18 damage. And that’s exactly what we need to defeat Cortez’s third Phase and end the fight! I like this strat because you can really see how Cortez was definitely a boss for Bobbery. He annihilates him with Bomb Squad, and it’s amazing. Awesome, awesome, awesome!

Now let’s look at Bob-ombast!

SHADOW SIRENS & DOOPLISS STRAT

15 HP, 15 FP
BADGES: Jumpman, All or Nothing, P-Down D-Up, Power Plus P x2, P-Up D-Down P, Mega Rush P, Power Rush P x2, FP Drain, Multibounce, Double Dip (30 BP, 39 with 1 HP Plus and 2 FP Plus)

ITEMS: Point Swap, Shooting Star

Click here to see the strategy in action!

T1: Multibounce, Bob-ombast (26, 26, 16)

T2: Double Dip (Shooting Star, Point Swap Bobbery) (20, 20, 10), Bob-ombast [KO, KO, KO]

This is a variation of the classic “Double Dip and destroy with Yoshi” strategy, but with Bobbery! There’s a lot to unpack, so let’s dive in!

The goal of this strat is to finish off the Shadow Sirens & Doopliss with Bob-ombast. To do that, we need to get Bobbery in Peril. So, we’ll need to use Point Swap. We also don’t want Mario to be KO’d Turn 1, so we equip P-Down D-Up to guarantee he lives all 3 attacks in the worst case (4 from Doopliss, 6 from Marilyn, and 3 from Beldam with guarding). Bobbery’s got 40 HP, so he can’t die Turn 1 even with P-Up D-Down P equipped. We also have FP Drain equipped, but we’ll get to that a little later. With two badges that drop Mario’s ATK, we need to boost that back up to normal, which is 3 with Ultra Boots. So, we equip Jumpman and All or Nothing, a classic combo that boosts Mario’s ATK by two for jumps at the BP cost of one Power Plus. We gave Bobbery all we could for boosting a partner’s ATK for maximum damage.

Okay, let’s actually get into this! Turn 1, we Multibounce for 3 damage each. Now, Multibounce is 2 FP, but because of FP Drain, we get 1 FP back, leaving us at 14 FP. We then Bob-ombast for 11 damage (8 base + 3 ATK from badges), which is 14 total for the turn. Now, here’s where FP Drain came into play. Without it, we’d be at 13 FP, and 13-9 is 4. With FP Drain, we get that one crucial FP back to be at a perfect 5 FP. Then, Doopliss and the Shadow Sirens attack. Turn 2, we are now able to do the classic Double Dip -> Point Swap thanks to FP Drain. We use a Shooting Star first for 6 damage, then Point Swap Bobbery, putting him at 1 HP and giving us all of our FP back. In Peril, Bobbery has +5 ATK from Mega Rush P and +4 from the two Power Rush P badges. That’s 9 ATK total, bringing Bob-ombast up to a staggering 20 damage beast of a move. As you can see, we’ve left Doopliss and Marilyn, who have 40 HP each, at 20. Beldam, who starts with 30 HP, has 10 left. With one last Bob-ombast, we finish off Doopliss and the Shadow Sirens at the same time, with perfect damage on Doopliss and Marilyn. Unlike other strategies, Bobbery’s insane FP requirement for Bob-ombast requires a couple FP Plus badges or some level ups in FP, so it’s a little unoptimal compared to a partner like Yoshi with his 6 FP Stampede. However, achieving a 2-turn fight with Bobbery is pretty cool, and it’s always nice to use FP Drain!

That’s it for Bobbery. All in all, his few strengths are greatly outclassed by other partners thanks to his insanely bad FP economy and the inability to increase Bomb Squad’s power. However, he is a great tank and you’ll be hard-pressed not to use him in a Level Zero run; and, Bomb Squad can actually obliterate certain bosses. As always, feel free to modify or use these strategies yourself and try out Bobbery sometime! You might be surprised.

Next time, I’ll be covering another badge in TTYD. I wonder what it will be… oh, and hey, check out that Puzzle Challenge I mentioned earlier that features Bobbery. It’s pretty sick.

Just Sayin’

Kappy’s Spotlight — Lakilester

It’s that time again: #KappySpotlight time, where I talk about badges/items/partners/etc… that are generally seen as “bad” and not used very often by challenge runners. I dive deeper into why they’re perceived the way they are with some cool strategies centered around them mixed in! Today, I’ll be covering a partner in 64 that you get last and subsequently usually use the least — LAKILESTER!

LakilesterSPM
Moves:
Spiny Flip — Deals damage to a single enemy (3/4/5 damage)
Spiny Surge [4 FP] — Deals damage to all enemies on the field (2/3/4 damage)
Cloud Nine [4 FP] — Mario is evasive for 4 turns
Hurricane [5 FP] — Blows away all enemies on the field (no Star Points given)
Glitz Pit Rank: 7th (of 8 Partners)

Oof, 7th out of 8 partners. Lakilester is an interesting partner because he has one ridiculous ability in Cloud Nine, and the rest just sort of…fall flat. Now, this spotlight I won’t be crafting any strategies with Lakilester for one big reason: all of the partners in 64 function almost exactly the same besides a few differences in their support abilities. Many partners deal 5-6 damage with their basic attacks and can hit multiple enemies. With this in mind, many strategiess I can devise for Chapter 6 and beyond bosses can all be done with multiple partners, especially since Mario is the only one who can increase his ATK & DEF. For the most part, when I strategize for 64 I just choose a partner that can give me the damage I need for exact damage. What I’ll be doing this spotlight is instead going through the strengths and weaknesses of each move. So, let’s get started!

SPINY FLIP

Lakilester’s basic attack. This basic attack is actually really good because he can hit any enemy and it doesn’t make contact. No real drawbacks here — it’s easy to follow up with Mario’s Jump (or have Mario follow up on an enemy that was on the ceiling) after this hits, and it can act like an aerial hammer since other attacks that can hit aeril and ground enemies like Body Slam and Headbonk can’t hit spiky enemies, which Spiny Flip can.

SPINY SURGE

Spiny Surge is another solid move, but with a pretty hefty FP cost. 4 FP isn’t much in the grand scheme of things, but for the most part, enemies like to be on the ground. Just look at most of Chapter 7 & Chapter 8. A huge majority of those enemies are grounded, meaning Kooper can clean up with Power Shell for 2 FP less. However, Spiny Surge does have a nice niche uses as the most cost-effective way to get rid of the Tuff Puffs during the Huff N. Puff boss fight and the ice bits during the Crystal King boss fight. You can always use it to take out all Bzzaps with ease, although Multibounce will likely work just as well for less FP. Other than that…you’re probably not going to get much out of 4 damage for 4 FP. Better to use Sushie’s Tidal Wave or Parakarry’s Air Raid against higher HP/DEF enemies, especially since Sushie can deal waaaaay more damage with Tidal Wave for only 6 FP. Still, it’s not a bad move. It’s definitely heavily outclassed, though.

CLOUD NINE

Fun fact: if you equip all Luck-based badges available to you, you get ~50% evasion in Danger. With Cloud Nine, you get basically 50% evasion without needing to be in Danger. However, it cancels out all Luck badges equipped. It’s a double-edged sword, but really…this is way better than equipping Luck badges. This move alone is enough to keep Lakilester relevant. Cycling through Turbo Charge, Water Block, and Cloud Nine is a common strategy to keep Mario ultra-buffed at all times, especially with a Flower Saver or two equipped. The ability to have that much evasion for 2-4 FP is actually insane, and there are times where Cloud Nine will help you dodge 3-4 attacks in a row…all for a pretty low FP cost. It’s good. It’s great. It’s awesome. There are no drawbacks if you’re not manipulating HP and are trying to avoid attacks entirely. There’s only one downside to this move: experienced players don’t really need it, and will instead use Bow’s Outta Sight for a guaranteed dodge since you’ll likely only need to dodge once after being in Peril to finish enemies off. Oh, and I guess it’s still RNG-dependent, which isn’t good. But, I’ve seen it do amazing things, and that can’t be overlooked.

HURRICANE

This move is, well…useless. Unless you’re trying to not earn Star Points or save Star Energy, you can just use Up & Away or, well, run. Really, it’s disappointing that this is Lakilester’s Ultra Rank move — a stronger Spiny Surge here would’ve been more effective, but you can tell they were hinting at using Lakilester for Huff N. Puff with it being his second base move. Should’ve been Hurricane… anyway, this move does have a good chance at blowing away every enemy not named Bombshell Bill Blaster and is a tad more reliable than Up & Away or Spook. For 5 FP though, I’d rather use something else. If this move gave you Star Points, it’d be on par with Flurrie’s Gale Force, which would make it great in my eyes.

That’s it for Lakilester. As I said before, you can swap around partners when it comes to bosses and normal battles and see mostly the same results, so no strategies for this one. Partners in 64 are tricky to talk about. A lot of them perform the exact same function damage-wise besides a select few like Sushie & Bow, so you have to look at their unique abilities like Cloud Nine, Water Block, etc… with that said, Lakilester, while being one of the worst-rated partners, isn’t always a terrible choice. You’re just going to find yourself going to others more unless you’re specifically looking for evasion.

Next time, we’ll go over a badge in Paper Mario 64!

Just Sayin’

Paper Mario Talks — Kappy’s Partner & Special Move/Star Power Tier Lists (+ comparison to Glitz Pit lists)

As I said in my previous entry, the Glitz Pit Discord Server (link at the bottom of this post) cast judgment on badges in Paper Mario: The Thousand-Year Door, bringing to light a tier list for more hardcore players. This time, we’re going to go over something many players also debate on — Partners and Special Moves/Star Powers in both TTYD and Paper Mario. However, we did things a little differently.
Instead of giving a tier, we basically just rated the order of each from best to worst. While there are certainly “breaks” within these lists where partners could be placed in the same tier, we felt that an ordered list would work better for Partners and Special Moves/Star Powers given the small amount of each compared to badges. Of course, like with badges, the overall opinion of the 30+ players who voted and discussed these are a little different from mine. I’ll be showing you each list with my own ranking next to it, and talk about some key differences. Remember, the Glitz Pit list is framed with a challenge runner in mind. Let’s start with TTYD!

PARTNERS

2018-10-26 11_39_07-Just Sayin' - ryanklaproth@gmail.com - Evernote
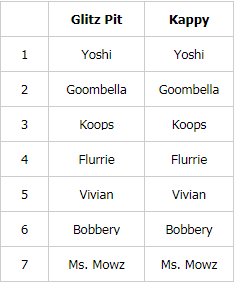
There’s actually not much to say here — I voted with the majority. There was a lot of debate between Yoshi and Goombella, but in the end, Yoshi’s ability to hit everything for huge amounts of damage barely won out over Goombella’s superior single-target damage and versatility with Rally Wink. To me, Yoshi and Goombella could easily be seen as the best partner — it just depends on how you fight. I fight with partners, so Yoshi is better. Flurrie and Vivian were another hotly contested pair.

SPECIAL MOVES

2018-10-26 11_39_59-Just Sayin' - ryanklaproth@gmail.com - Evernote
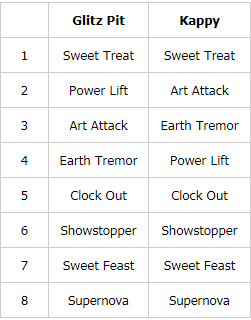
The glaring difference here is my opinion of Power Lift. I think Power Lift is great but unnecessary. A lot of the time, you can get an adequate boost in power with, say, Double Dipped Items or even just a single Power Punch. This is especially true for bosses where you’re planning to take damage to achieve Danger/Peril. The DEF boosts can get in the way, and while you can avoid those, it makes your ATK boosts worse since you’re wasting time waiting for the arrows to appear. It does pair well with P-Up, D-Down (and the partner variant), though. That was really the only difference. Supernova taking last might be a bit of a surprise, but Art Attacks just outperforms it at almost every step.
Alright, those are the rankings for TTYD. Let’s dive into 64!

PARTNERS

2018-10-26 11_40_13-Just Sayin' - ryanklaproth@gmail.com - Evernote
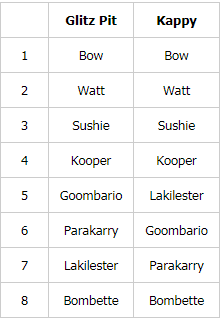
The big difference is the 5-7 spots. To be honest, these were big toss-up votes for a lot of people. While Parakarry is solid damage all-around and useful early-game, I rarely use him because Sushie does basically the same things he does but better. Air Lift is nice, but… Water Block is much better, and Lakilester has an AoE version. Goombario is uncontested in single-target damage, but it’s barely needed and requires Ultra Rank. Lakilester has Cloud Nine, a move that’s better than all 3 Lucky Badges combined in terms of evasiveness and he’s got a full-screen clean-up move in Spiny Surge, but I’ll be honest — I don’t use him often.

STAR POWERS

2018-10-26 11_40_47-Just Sayin' - ryanklaproth@gmail.com - Evernote

The big difference is my Refresh > Star Storm and Time Out > Smooch. I think Star Storm is great, but when it comes to dealing damage Mario usually has it covered. Refresh is useful throughout the game and is a key component in more restrictive runs. As for Time Out > Smooch — while Time Out really isn’t that great to begin with, I think the healing provided by Smooch coupled with its cost just isn’t really worth it. More than Up & Away, but I’d rather inflict status. There was quite the debate over some of the middle locations — partly because, well…you don’t really need any besides the first 3; they just out-class the rest super hard. For me, I’d take status > 20 HP heal, especially when that’s readily available with items. Refresh at least is only 1 SP and can be used multiple times with lower HP amounts (which challenge runners tend to have rather than going for 25+).

And that’s it for TTYD/64 Partners and Special Moves/Star Powers! We’re now on 64 Badges, so expect another post in the future once that’s been completed. Do you agree or disagree with these lists? Let me know in the comments below, on Twitter, or on Facebook! And that post I mentioned in my badge tier list is coming! I swear!

Link to Glitz Pit Server: https://discord.gg/0yohFnSHDvBexU7i

Just Sayin’

Improvement in Smash 4 BONUS XII – Practice Methods III

**If you’re unfamiliar with Smash, this probably isn’t the post for you unless you’re curious. In order to get a full understanding of this, you should be familiar with Smash’s game mechanics and lingo (EX: Forward Air = Fair), specifically the mechanics for Super Smash Bros. Wii U.

Let’s talk about who you play with.

A good way to improve and grow as a player is to find a person (or a group of people) to practice with regularly. A Practice Partner or Practice Group (I would assume this could be called a crew) is the general term I’d use for this. Both have their advantages and disadvantages, and they change how you practice compared to just grabbing a friend.

These people are more than just practice partners, though. Improving your own mindset and attitude is also a big component of Super Smash Bros., and even having just one practice partner can really help you with that. You’ll celebrate big wins, get through tough losses, and generally support each other as you both strive to improve and get better. If you’re in a group, those people are your best picks for doubles because of the synergy you’ll be building with each other. You’ll keep each other honest and not let you take crazy rash decisions. It’s a great experience to have that kind of support while improving. I highly recommend it.

But let’s get into the more technical aspect of practice partners/groups. There are some inherent advantages and disadvantages that come with this kind of practice that differs from playing with friends or in friendlies. These will be written as if you have one practice partner, but these all apply to a practice group as well.

Advantages

– Deeper Conversation
: you can really take the time to talk out scenarios and explore each and every aspect of a MU or about fundamental aspects of your play. While you can achieve thoughtful conversation when playing friendlies, I’m telling you right now that it’s much easier to achieve with a practice partner. There’s a different atmosphere.

– MU Knowledge
: you’ll be playing this person so much that you’ll have a very solid understand if the more objective part of the MU between your character and theirs.

– Studying
: it’s much easier to ask a practice partner to sit down for a couple hours and watch videos of yourselves playing and talk about it.

– Doubles
: because you’re playing with each other so often, you’ll be better equipped to deal with their tendencies in doubles, and you can practice team combos/setups more easily.

Disadvantages

– Playing In Bracket
: This is the one person you never want to see in bracket. They know how you play better than anyone, so it becomes a grueling duel of neutral when you two play. And it’s frustrating when you lose, even though you want to be happy for their win.

– MU Knowledge
: surprised? This is actually a double-edged sword. You become so used to their style of play that when you play someone else that uses that character, you might find it to be extremely difficult to win if they play differently. I’ve seen this happen countless times back in the Brawl days.

So, when I said that this is a person you practice with regularly, I’m talking at least twice a week outside of tournaments. This isn’t just a “hey, wanna hang and practice a bit?” thing. It’s a “yo, time to practice – my place or your place?” thing.

If you’re looking for a great way to jump start yourself on improvement, I suggest grabbing a practice partner or joining a crew (if any are around).

——

Being able to utilize this kind of practice can really help improve your game. Just try to be cognizant that while you’re also gaining MU knowledge, you’re also becoming conditioned towards a certain style of play. being caught unaware because of this can spell the end of your tournament life, and you don’t want that to happen when it really counts at a monthly/national/major.

Also, having a strong support group, especially when it comes time to travel to out of state tournaments and majors, is such a huge boon to you and to your mental game. You really have to experience it for yourself.

Just Sayin’

I – Fundamentals
II – A Different Way to Look at Match Ups
III – Attitude
IV – Friendlies
V – Stages
VI – Preparing for a Tournament
VII – Training Regimens
VIII – Character Loyalty

Check out the BONUS series!

IX – The Plateau
X – Practice Methods I
XI – Practice Methods II
XIII – At a Tournament
XIV – Practice Methods BONUS IV
XV – Game Flow