This blog post will serve as a reference page for all written Kappy Spotlight posts on this blog for quick and easy access.
Tag Archives: Blog
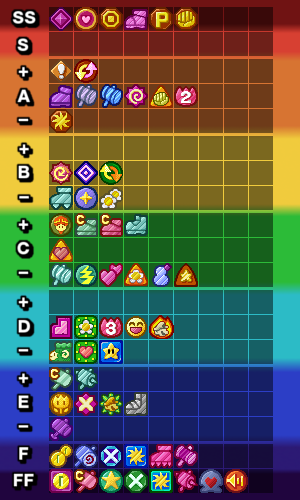
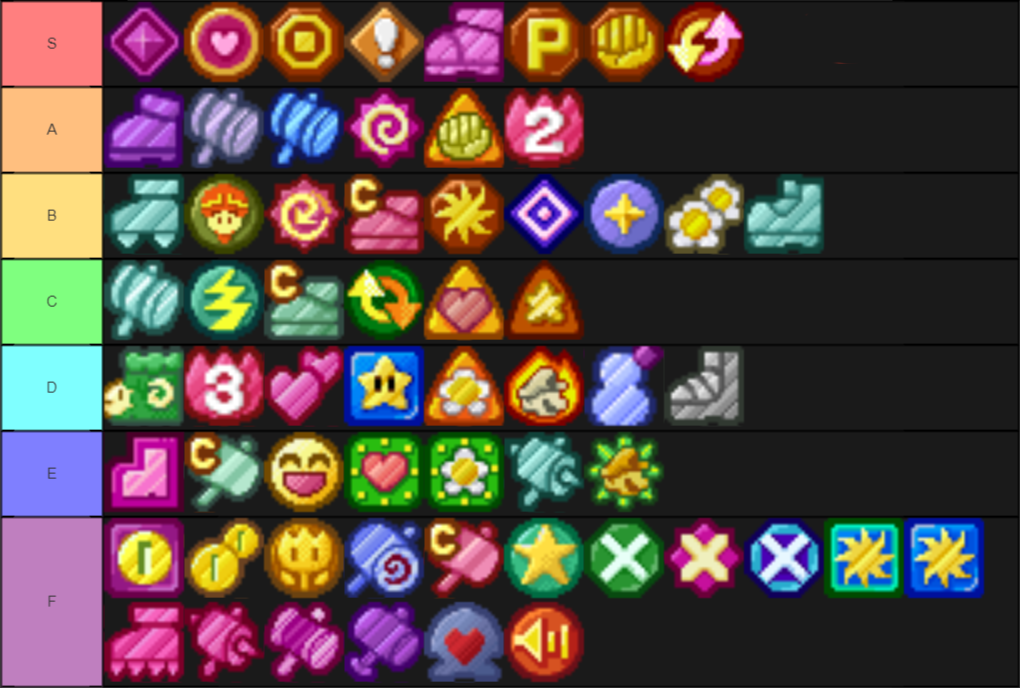
Paper Mario Talks — Kappy’s 64 Badge Tier List (& comparison to Glitz Pit Tier List)


All or Nothing (GLRB: A+; Kappy: S) — I wanted to point this one out because All or Nothing is S in TTYD on the Glitz Pit tier list and it’s still got the same perks over Power Plus and is available even earlier (and it’s from Rowf’s Badge Shop)! Can’t believe it didn’t make it to S here. I thought it was a no-brainer.
Kappy’s Paper Mario Challenge Running Tier List v4.0 (December 2018)
Since the end of December of 2017, I’ve been keeping tabs on the players who challenge run Paper Mario and Paper Mario: The Thousand-Year Door. I did this mainly because despite there not being an official list of the best players from the Glitz Pit Discord, there’s still discussion about it. Also, I like tier lists.
No extra fluff like last update. The only thing I’ll mention is I didn’t write a little blurb unless your position changed in some way or something really stood out. So, let’s jump right in.
-
+ symbol means edge case for next tier up
-
This is my personal opinion; I repeat: this list is NOT objective.
GOD TIER
-
Jdaster64
-
Kappy — The + goes away. To be honest, I definitely feel like I’m on a decline, and I’ll bet a lot of people are thinking the same. I’ve been focusing on my personal life (since I got a new puppy) and my other streaming endeavors, putting challenge running on the back burner without finishing everything I wanted to do (particularly in TTYD). In order to 110% cement myself as the Greatest Of All Time in Paper Mario challenge running, I’m going to be kicking myself into high gear next year. I don’t like getting rusty, and I’m feeling more determined than ever.
-
Koop
-
ilikepieinmouth — Pie has now completed Impossible Pit and a slew of ultra superguard heavy Pit runs. At this point, I would go as far as to say he is the best superguarder in TTYD. However, I think he’s going too far into these superguard-heavy runs. I’d like to see Pie demonstrate that he can strategize with the best of them and not need to rely on raw superguarding to push through to victory — in fact, I’d like to see some superguardless runs. At this point, just seeing him superguard everything is getting stale, and while his position here is pretty stable, you can always fall from godhood; in my eyes, he will if he doesn’t change up his game…
ELITE TIER
-
Fatguy
-
GamerFourFun — With a recent Level -1 completion in 64 (including Final Bowser), GamerFourFun has reached Elite level in both games. This guy just keeps completing runs from fun to difficult. I hope he continues to play…he has potential to push through to God tier in either game. I think he goes relatively unnoticed, which is too bad. Go watch this guy!
-
MilesLuigi
-
Olmi
-
A. A. Ran
-
amazydayzee
-
Gibstack — With a flurry of Pit challenges and some cool other challenges that aren’t the Extreme Randomizer, I think Gibstack has finally earned his spot as an Elite player in TTYD! His best asset is his strategy, which is something I rarely see in Elite TTYD players — most of them lean on the superguard side.
-
DarkMario1000
GREAT TIER
-
MellowMathTeacher
-
DarkMario1000
-
Dyla+
-
Kyle — Another explosive challenge runner. Like Dyla, he completed a bunch of Pit challenges: PHP, PHP NMRP, 10 HP PHP NMRP, Prologue Pit, and then 10 HP Prologue Pit all blazing fast. A couple things are holding him back, but to summarize — not enough strategy-involved challenges, and not enough footage. If he’s trying to be the best superguarder, then I’d say he’s easily the 4th best superguarder…but I’d like to see how his consistency evolves over time before I say he’s better than any of the current top 3.
-
Miccat87+ — Miccat has completed Disabled Pre-Ch2 Pit, and is now working on BP Only and No Damage. This will be a great chance to see how he strategizes, and might be what pushes him over the edge into Elite. We’ll just have to wait and see…
-
StarmanOmega
-
Timmy — Now that the 64 community challenges have gone through almost the whole game, I’ve been able to see more of Timmy’s play. The more I see, the more I like, and with Pro Mode Single Partner already on his resume, there’s other place but Great. We’ll see if he can push further than this.
-
TwoPieRadian
GOOD TIER
-
simodomino
-
Gible_V
-
TwoPieRadian
-
A. A. Ran+ — Thanks to the Community Challenges, I can see a clear improvement in A. A. Ran’s play in 64. There’s a lot of strategizing coming from him, and while his strategies aren’t the most elegant, they’re definitely getting better. I expect him to be Great tier by the end of them.
-
Jon — A newcomer with the community challenges underway. He’s not bad; I can easily seeing him pushing into Great soon, but we’ll see how he fares from there.
-
Lolyuri — Another newcomer thanks to the community challenges! Lolyuri is good, and I’m seeing some nice play…he could push into Great easily if I see more.
-
Mailguy — Yet another newcomer with the 64 Community Challenges underway. He relies a little too heavily on RNG as his core, but shows promise. He just needs to work more reliability into how he plays.
-
Miccat87
INACTIVE TIER
-
Auron Nomcario — Great Tier (64) | Good Tier (TTYD)
-
avengah — Elite Tier (TTYD)
-
Blanket P.I. — Great Tier (COMBINED)
-
catbooger — Good Tier (TTYD)
-
Codebox — Great Tier (COMBINED)
-
DiamondCrafterA — Good Tier (TTYD)
-
Dount Cooku — Good Tier (TTYD)
-
Feposo — Good Tier (TTYD)
-
Gradis — Good Tier (TTYD)
-
Jayjar100 — Good Tier (TTYD)
-
JakeTheSnake — Good Tier (TTYD)
-
Mathcat — Good Tier (TTYD)
-
Michael The Fox — Great Tier (TTYD)
-
Mr_Some1 — Good Tier (TTYD)
-
ngburns — Great Tier (TTYD)
-
OmegaRaptor — Good Tier (TTYD)
-
Prentiscool — Good Tier (TTYD)
-
Skawo — Elite Tier (COMBINED)
-
Snowy — Great Tier (TTYD)
-
Starlad — Good Tier (64)
-
stebbdogg — Great Tier (TTYD)
-
Wayoshi — Elite Tier (TTYD) | Great Tier (64)
-
ThatOneSpyGuy — Elite Tier (TTYD)
-
TRex Quisite — Great Tier (COMBINED)
-
Pie, in my opinion, has succeeded me as the current best superguarder in TTYD. Congrats, Pie! Your hard work in that area has paid off!…but seriously, go do some superguardless challenges.
-
Kyle really shook up the game. If he completes Impossible Mode soon I think he’ll be ahead of A. A. Ran and become the third best superguarder.
-
Congrats to GamerFourFun for becoming Elite in both games!
-
It’s been 1 year since I started making these. I hope you all have been enjoying them as much as I have making them!
And that’s it for this version of the tier list! I hope you all enjoyed reading my thoughts on this. If you’re interested in making it on this list, start challenge running (and if I missed you, let me know)! A great resource for challenge runners is the Glitz Pit, a Discord server dedicated to challenge running the Paper Mario series.
Just Sayin’
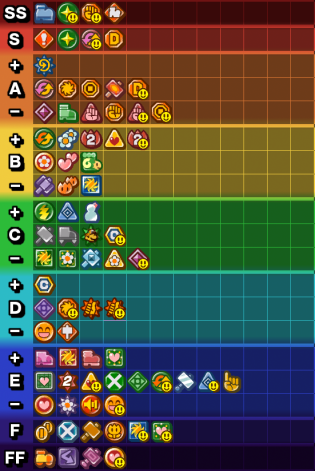
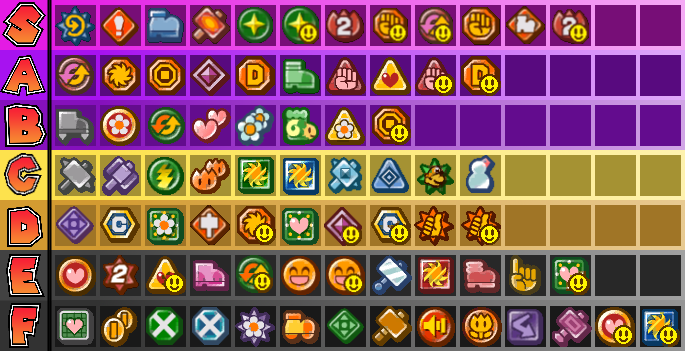
Paper Mario Talks — Kappy’s TTYD Badge Tier List (& comparison to Glitz Pit Tier List)
See, we had some 30+ players voting in the Glitz Pit, and all votes were taken and boiled down to a score. However, because of this, some votes for each player for certain badges differ from what is shown on the Glitz Pit. Obviously, this is to be expected; I, of course, have some pretty varied opinions on some badges, so let’s compare how I’d rate them to how the Glitz Pit rated them!
Before we do that, let’s categorize what each tier means (taken directly from the Glitz Pit on ranking badges):
S Tier — Well above average
A Tier — Above average
B Tier — Slightly above average
C Tier — Average
D Tier — Slightly below average
E Tier — Below average
F Tier — Well below average
Now, F Tier badges aren’t “unusable”…generally speaking, S-B tier are badges you’ll likely keep equipped a good portion of the time, while C-F are more niche picks and filler.


I’ll talk about a few key differences:
Power Rush (GPRB: S; Kappy: A) — Yeah, I’m assuming heads will spin here. While, obviously, this badge is one of the most potent in the game and Danger Mario is easily the most optimal and broken strategy, we were rating them as if you could only get 2. In that context, I voted for A, because 2 Power Rush badges just aren’t as good as 1 Mega Rush. 2 BP for +4 vs 1 BP for +5, and with how easy it can be to get into Peril if you know what you’re doing, it’s really not an issue of difficulty when it comes to manipulating HP.
Fire Drive – (GPRB: A; Kappy: S) — This one’s a weird one. I’ve already explained why Fire Drive is in my Top 10 Badges in TTYD in my video on the subject, so I’ll defer to that for my explanation, but to summarize — my S vote comes from how this badge enables the possibility of ultra-hard challenges like 10 HP Prologue Pit, 10 HP No Mega Rush P Pre-Hooktail Pit, etc…
Double Dip (P) (GPRB: B+ [both]; Kappy: S [both]) — Again, another set where my video explains my reasoning here. I like free actions, and this badge provides them in spades for items. Many players felt they didn’t really need it, but I feel it’s an invaluable resource that makes set up ultra fast, ultra easy, and ultra awesome.
Power Jump (GPRB: C; Kappy: B) — Power Jump is actually a great option for early-game and with Flower Savers can be an amazing (and more damaging for a portion of the game) alternative to Spin Jump when stacked with 2 of them. I’d pick this over Spin Jump until you either get Ultra Boots or until you’ve got a couple ATK+ badges, especially against enemies with even 1 DEF. It’s an aerial hammer-esque move for Jump!
Pity Flower (GPRB: E-; Kappy: F) — A lot of casual players know this badge is pretty bad, si it might come as a surprise that the collective challenge run community got it into E tier (albeit on the lower end). While I voted F, I can actually understand how it ended up here, since when looking at other F Tier badges, this one can have niche use.
Those are the big differences I wanted to comment on, and that’s it for this post. What do you think of each list? Agree, disagree? Let me know in the comments below, or on Twitter, or on Facebook! I swear I’ve got something new coming for this blog for Paper Mario Talks soon. I should be releasing another post in early October comparing Items and Star Power/Special Moves!
Just Sayin’
Paper Mario Talks — Why Pre-Hooktail Pit is the Perfect Challenge
There are many, many challenges in Paper Mario: The Thousand-Year Door — Level Zero, No Jump No Hammer, Single Partner, BP Only, Double Damage, etc… but one among them all stands the test of time, for me, as the best TTYD challenge out there. That challenge…is Pre-Hooktail Pit.
A Pre-Hooktail Pit run is a run where the player completes the Pit of 100 Trials before completing Chapter 1, which is done by defeating Hooktail. Back in the old challenge running days, this was considered one of the top challenges. Today, I consider it to be one of the “gatekeeper” challenges, a challenge that breaks you into the higher tier of Paper Mario players. Despite my labeling it as a “gatekeeper” challenge, I think it’s the perfect challenge for upcoming challenge runners and veterans alike. Here’s why:
1) It tests everything
Remember my first blog post for Paper Mario Talks? I talked about the 4 skills of a challenge runner. Well, this challenge tests every single one of them and does so in an amazing way. You need to manage peril’d partners, choose the right badges/items for the job, work with on-the-fly RNG, and figure out strategies for all the various enemy loadouts you’ll encounter. Sometimes, you’ll be put in a tight spot and need to superguard and guard well or execute good Power Bounces, Multibonks, and Sweet Treats. Seriously, no other challenge tests everything at the same time so much.
What separates this from a challenge like Level Zero is it also tests your endurance. In full-game runs, you have the luxury of saving and quitting, only doing bite-sized chunks of the challenge. Pre-Hooktail Pit (and other Pit of 100 Trials challenges in general) provide no such luxury. You have to go through the whole thing, including Bonetail, before it is truly complete. And while I don’t consider endurance a particular skill of a Paper Mario challenge runner, it certainly is a skill that any player can benefit from. If you get too tired, you can start committing silly mistakes that can cost you a run.
2) It’s modular
Pre-Hooktail Pit is only the base form of its type of challenge. One can also choose to up the difficulty by including extra restrictions such as 10 HP (Mario cannot increase his HP above 10 in any way) or No Mega Rush P (cannot equip the badge Mega Rush P). You can also combine the two to create a devilishly difficult 10 HP No Mega Rush P restriction. All three of these add to the difficulty, but don’t take away too much from what it’s testing of the player. They all require a little more superguarding, but other than that they function mostly the same, and so provide a good stepping stone of challenges to attempt as you improve as a player. This is what allows newer challenge runners and veterans to continue performing this challenge.
What’s more, speedrunning the base form of the challenge is somewhat popular, and tests the player in a completely different way since you don’t have time to loaf around and prepare – you need to think on your metaphorical feet much faster than someone going through a normal Pre-Hooktail Pit run, who has all the time in the world to figure out a solution. While it’s a little too RNG-heavy to be a completely legitimate speedrun, it is a cool and interesting take on the challenge.
Now, other full-game challenges are also modular (it’s a nice thing about TTYD’s challenges – many are modular), but I particularly like the increase in difficulty the different restrictions of Pre-Hooktail Pit provide without sacrificing something. Many of the “step ups”, so to speak, of full game challenges omit or heavily downplay something crucial in terms of skills being used.
3) There are multiple ways to complete it
While most players follow a general rough guideline on stats, badges, and items to bring, the challenge itself can be completed in a myriad of ways. Some players will choose Heart Finder or Item Hog, Quick Change or Power Plus, Pretty Lucky or Close Call, etc… some decide to upgrade Goombella, others decide to upgrade Koops (or both!). Some will bring Life Shrooms, others will bring Courage Shells, Fire Flowers, POW Blocks, Mushrooms… in short, there’s a lot of variety depending on the player’s preference, and it changes how the run is tackled. While some strategies are definitely better than others, there are enough viable strategies to keep the run fresh and exciting for new players looking to enter challenge running and for veterans to try new things when doing the run.
Again, lots of full game runs offer this same level of variety, but I think an important distinction to make here is that many strategies will be developed on-the-fly that will vary. While you have time to prepare in a Pre-Hooktail Pit run, you have to work around your preparations in case something goes wrong. When you’re really only fighting bosses, you can prepare very well and not have to worry about something going wrong impacting your strategy too much.
And, well…that’s really all I have to say on the subject. I do want to say that most challenges, full game and Pre-Hooktail Pit, are very good, barring a select few I don’t think test all the skills I’d want it to. but if you ever want to get into the next tier of Paper Mario players, Pre-Hooktail Pit is a perfect place to start. There is no better challenge run. Give it a try!
Just Sayin’
Paper Mario Talks — How To Break Combat (64): Status
In Paper Mario, there are six kinds of status that the player can inflict on an enemy (Dizzy, Stop, Paralyze, Sleep, Shrink, Attack Down). Let’s take a look at them and how to inflict them!
Attack Down – Reduces an enemy’s attack by 3 for 4 turns. [Chill Out]
Dizzy – Opponent cannot move for x turns (varies by enemy). [Dizzy Dial, Dizzy Shell, Dizzy Stomp]
Paralyze – Opponent cannot move for x turns (varies by enemy). [Power Shock, Mega Shock]
Shrink – Opponent’s damage is halved for x turns. [Shrink Stomp]
Sleep – Opponent cannot move for x turns (varies by enemy). [Sleepy Sheep, Sleep Stomp, Lullaby]
Stop – Opponent cannot move for x turns (varies by enemy). [Stop Watch, Time Out]
For your information, the range of status where it lasts for x turns can vary from 1 – 4 turns.
Of these six, four of them do the exact same thing – hinder an enemy from moving. Without any differences (attacking a sleeping opponent does not wake them up, for instance), these statuses all cripple opponents in the same way, making combat in 64 very simple – find an enemy’s weakness to an immobilizing status and exploit it.
While I enjoy using status, and I consider knowing when and where to utilize status as a key element in strategy in Paper Mario and Paper Mario: The Thousand-Year Door, the monotony of what status do in 64 makes combat really easy. Furthermore, because so many status do the same thing, you can effectively lock an enemy into status and prevent them from ever attacking if they’re weak to two different kinds or very weak to one. Compare this to TTYD, where Dizzy no longer immobilizes enemies, Paralyze doesn’t exist, and enemies can wake from Sleep after being attacked; there’s much more variety, and you can’t really prevent enemies from attacking.
Now, while status is pretty broken in 64, the ability to inflict the same condition with so many different status does have its few benefits, but that mostly applies to challenge running. If you’re trying to inflict status to start setting up with, say, Super Jump Charge, you can cycle between an item/badge and Dizzy Shell or Power Shock to try and get a status inflicted sooner. It’s a cool concept, but that’s really all I find cool about the monotony of status in 64. This specific brand of status monotony is also why really hardcore challenges can be beaten in 64.
Let’s take a small turn and focus on the other two status, Shrink and Attack Down, which both reduce damage Mario takes. As you saw in my previous post, Chill Out’s Attack Down status is ridiculous. For 4 turns, an enemy has -3 ATK. That’s a big deal for the Tank Mario build and for just longevity in general. It cripples enemies in a different way. Sure, they can attack, but doing no damage is the same as not attacking at all (except for the ones that inflict status on Mario, but let’s not talk about those…). To supplement Tank Mario even more is Shrink, which halves an enemy’s damage. Halves. That’s Last Stand without having Last Stand active! With Last Stand and Shrink active, you’d be hard-pressed to find something that can damage Mario besides Final Bowser.
Speaking of… I find Bowser really interesting. Up until Bowser, every enemy in the game is stuck with their fate when inflicted with status. Bowser can remove status from himself (including Attack Down!!) with the Star Rod buff, and is the only enemy capable of removing status on Mario and his Partners. The entire game, you’re used to being able to do pretty much whatever you want, and then Bowser turns that on its head. It’s probably why I find him such a fun and interesting boss, and also why he really ramps up the difficulty curve when it comes to challenge running. But, we can talk about Bowser another time.
Anyway, the bottom line is…status is broken in 64. Even superbosses in Paper Mario: Pro Mode can’t prevent you from status-locking them. And while it’s cool to do that and be rewarded for using different status, I wish there had been more variety because just selecting a different item to do the same thing to an enemy can get a little stale.
Just Sayin’

You must be logged in to post a comment.